30 November 2010

My little find at the Store

Last night I went to the local grocery store to pick up a few things for the week and I ended up going to where the magazines were.  I often check out the different beading magazines and I'm not sure why but I hope that for some little miracle theres a polymer clay magazine... but there never is... so I settle in on checking out those beading magazines.

I ended up picking up a magazine with some very awesome ideas and I'm hoping to get a few of these on the go for Christmas gifts.  I know, I've got a lot to do already if I plan on getting things done, but I am just excited!


Best of Bead Style was a little gem in the beading magazines this month and there are as it says in the title 64 projects to look at and make your very own.  I've got a couple that look like they wouldn't be to hard - and I really like that the layout makes it easy for those of us who aren't trained in jewelery making to be able to follow and understand.  LOVE IT.  So I'm planning this weekend to take a bit of time and try one or two projects and see how they turn out.

29 November 2010

Mellow Monday: Warming the Heart on a Rainy Day

Here I thought I would be chalk full of inspiration with what I find online during the week... and this week has been one of the most bizarre weeks ever.  I couldn't get inspired to save myself.  But today has been one of those rainy, miserable, windy sorts of days... and I think I'm craving some sunny days and gorgeous sunsets.  Here's a little bit of what I find that makes me happy...


These lovely creations from let to right, top to bottom can be found at the following sites:

21 November 2010

Christmas Tree, Oh Christmas Tree

Yup, I'm crazy.  After making the Santas I kicked it up a knotch and decided to try making some Christmas Trees.  They are made out of Fimo Polymer Clay and I added some little sparkly beads to give it a little sizzle.   They aren't too big, they can be placed on a mantel or a Christmas tree... the choice would be yours to make.  But I thought they were fun... my only worry when I was making them was if I would have enough clay.  Luckily I had both a plain red and an "effect" red that had the sparkles in it.  So I tried one tree of each. 

Here's how they turned out...

I rolled them out... it took about 3 rows of the Fimo Clay to get
my trees to the right size.  I honestly thought it would take
more clay to get the desired look... happy it didn't!

My two trees are ready to be decorated!

My completed little trees.  One with just swirled white Fimo
clay and the other with dots of Fimo and my little jewels
for that added "OH LA LA"
I have to say that I am really happy with the way the little trees turned out.  Now just to add a ribbon on the top so that they can be added a  Christmas ornament... or not, depending on what you want to do with the little ornaments. 

Having just taken the Christmas tree ornaments out of the oven.. I don't recommend baking them with the jewels.  Even though it's a low temperature, it still make the jewels cloudy and they fell off.  So I put some new ones back on with a bit of glue and they look pretty fab-oosh!

Santas, Santas and more Santas

 Well with my new cutting board to use to make my little creations on, I decided to start with some Santas since it's getting closer to Christmas.  I had debated on how many to make and what they might be used for.  Do I create a little Santa character, do I make some charms, do I make some jewelery?  I wasn't too sure, but yesterday I had picked up some earring backs and figured they'd be cute and maybe someone might want to wear them. 

I decided to give it a whirl...

Starting out with my clays for my Santas
I decided I should make them pretty small... but with the detail I planned on giving the Santas I couldn't get too small.  It was a bit of a toss up now as to what I wanted to do, but I decided to stick with earrings.
Santas faces are coming together... slowly!

Now a little personality... faces are done

Here's the completed pair.... HO HO HO

Excuse the dirty finger nails...so full of clay!  But these are
the backs I picked up at Michaels on Friday and I figure
I'll make a pair of earrings and see how they fit on the ear.

After making the Santas... they may be a bit big, as I wanted them to fit well on my daughter's ears. I'll let her try them on and see how she likes them.  If they're good to go I'll put the backs on the other 2 sets I have and she can give them away at Christmas time to her friends if she wants.  I really enjoyed making them... I wonder what I should try next???

** Update **

I had added the earring backs to the Santas last night and now the glue is dry... here's what they look like when I put them one.

Don't look too bad...eh!

20 November 2010

Something new to work on


I had been reading that some people who worked with Polymer Clay worked on a Tile.  I went out today in search of a nice smooth tile to work on and I couldn't find one so I decided to by a cutting board instead.  It's great to get away from working on some paper so I don't get clay on the table.  SO NICE TO HAVE!  I wish I had thought of it sooner.  Tonight I made some Christmas-y do-dads and I have to say it was so nice not to have to worry about the paper and colour transfer and getting holes in the paper.  It's a nice smooth surface... and I can't complain!

Cat Baby

I was on a bit of a roll after making my Shadow box and though I would give my try at a little character.  I had fun making my little cat baby.  Yesterday I had picked up some clays and some sparkles and throught I'd try them out on this little guy.  I had thought by adding it to a little brush that I could brush on the sprinkles nicely over the little fella.  Well, it didn't really work out as I had planned... the sparkles kind of stuck and clumped... not as awesome as I had thought but it's a learning process and here's the result.  I ended up scratching off some of the clumped up sparkles with my finger nails and I don't think it's so bad.

I am looking at getting something more together for Christmas and I'm hoping that I'll have a chance tomorrow to work on some ideas I have.  I guess I'm getting into the mood as it's started to snow last night.

Since heading into Michaels on Friday to take a look at what I could get my hands on for my clay projects I am looking forward to trying some new things... like sparkles, liquid clay, and I picked up some beads to add to my Christmas decorations... oh and some earring backs so I can add some polymer clay designs to them... it should be interesting... and hopefully I'll have a bit more to show you later on.

A Shadow Box with a little Name

With the new arrival of my nephew in a few weeks I figured I should make something for my brother and his wife for the upcoming arrival.  Now I'm really hoping that they stick with the name... since it fits pretty darn nicely in the shadow box I picked up.

I think I must have spent about 4 hours working on this little project and I have to say for the first time I went with a combination of Fimo clay and Premo clay... I'm not sure I'm loving the new Preemo clay I picked up.  Not as easy to get soft... and it really took a while to make it maliable... and my hands hurt!   But this was the only white soft clay available at Michaels when I stopped in there today.  I think it's really the season of Christmas knick-knack making because there sure wasn't much in the way of clays.  Which sucks because I was hoping to pick some more up... but really stuck with only a few, as I had to delve into the world of Premo and I didn't really know what that clay was like.

15 November 2010

Monday Madness: Christmas


I'm on the lookout for great Christmas Ideas this year and thought I'd give Christmas ornaments a whirl since I'm really enjoying working with Polymer Clay.  There are so many wonderful designs and creative ideas... like how about a polymer clay character hanging onto a christmas bulb ornament or a little quirky scull and crossbones.... with holly to a Manetee with Candy Canes!  I just really enjoyed going through Etsy and checking out everyone's creativity and makes me want to get creating!

Here's a bit more about the pictures above... going left to right, row by row.
I'm not quite sure what I'm going to be making for Christmas this year, but I'm hoping to get enough time to do something homemade... for the first time since I was little.  I don't know what it is about thinking about creating something, setting your mind to it, molding the clay to how you want it to look, cooking it, and then the finishing touches of paint and gloss... it really gets me excited.  Maybe it's the creativity of it all.  Anyway... I hope you enjoy the picks I made today and it inspires you to create your own little characters and ornaments.

09 November 2010

Wedding Cake Toppers


I think I'm absolutely obsessing about Polymer Clay.  Since I've started just about a month ago I've been searching the Internet for ideas for my next creations I'm going to try my hand at.  I've been curious about those cake toppers that I've seen online.  I thought it was a great idea as we all know you get something like this done at a cake shop and then it gets put away in a container for a bit and then it has to be thrown out eventually. With Polymer Clay toppers you can always put it away, and then bring it out every year or whenever you have a special something happening... depending on the type of topper you have made. 

I found this video on YouTube and thought I'd share.  I thought the dresses were beautiful and I like the idea of the "not so realistic" look that they have.  I also found a great site called Feats of Clay by Sarah and I enjoyed reading a bit about her....
Not forgetting long suffering husband Allan, who seems to permanently walk around the house with bits of clay stuck to his socks!
For those of us who work with the clay... I know I get bits of it stuck on my socks and had a bit of a chuckle when I read it.  I think I may just have to give this a try and see where it takes me.  I like the idea of cake toppers and the idea that they can be kept forever really, first on your cake and then on a shelf... added to another cake... and it goes on and on. 

See, this is where I just start to get carried away and it's so much fun!

08 November 2010

Monday Madness: Wire Jewelery


I have to admit I'm a huge fan of wire jewelery.  Especially the works that I've found on Etsy... if only I had an endless supply of money I would buy every one of those in my list of lovliness!  I thought I'd spend this Monday taking a peek over at Etsy to see what wonders they had on hand.

Starting from the top left and working across then back down.... enjoy!
Yes, a bit off the topic I've been so caught up in, that being those polymer clay creations.  I just really enjoy how creative everyone can be and I figure my Monday Madness will be dedicated to what I find really beautiful and unique.

07 November 2010

Bought a Book Today


You see this is where it all started.  I saw someone who had made some little faces and pink ribbion magnets for the Breast Cancer awareness and I asked her how she had made them... hello Fimo clay.   So I decided ot look it up on the Internet as I'd never even heard of it before, and there they were.  Pages and pages and pages of little foods.

This is where I started my adventure.  Some of it was slightly embarrassing as I look at them now and they're a bit big.  What I got from it though was that I really enjoyed it... happy accidents and all.  So yesterday I stopped into Chapters and picked up this book.  I was stoked!

Here are few things I made last night... (I will be the first to admit... perfection isn't a word I would use for these little designs... handcrafted goodness... you bet!)

The first one I made from the Polymer Clay Cookbook.... APPLES!

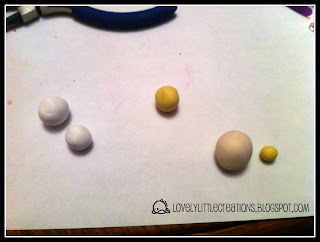
Getting the shapes right and making sure they were
approximately the same size... which is suprisingly a bit
of a challenge for me.

Now they look about right!

After shaping them, I stuck in a pin and then placed some
brown Fimo clay on the pin and rolled it down to the
apple to make the stem.

Added some finishing touches... leaves!

Voila!  Apples :)
But it didn't end there... those pictures in the book were too tempting and I wanted to know how to accomplish the look and figure out how other people make bends that stick, things that won't fall off... basically I wanted to know if I was doing it right.

Next step... BANANAS!

Balls of Fimo clay are ready!

Add a bent pin... then mold the Fimo Clay around it.
Seems simple once you know the "secret"

Yummy Bananas!

I was happy to find that there was a method on how to create coffee cups... as I'd been making tea cups and they were the bane of my existance!  Now that I know how to make cups, it will be SO MUCH EASIER!

Mmmm... Hot Cup of Java!
It didn't stop there, I ended up making some Hamburgers and Tacos too...

I have to say this is one of the more fun little charms that I have
made... yummy tacos, with mutliple layers of meat, cheese, lettuce,
tomato, sour cream and green garnish.

These hamburgers are stacked pretty high, I wanted the
layers to be a bit thicker so that people could see them.  I'm
thinking if I make them again... thinner tomatos and cheese!
I am totally enjoying the Polymer Clay Cookbook and when I get a bit more time I'm going to show you more.  I'm thinking ice cream, waffles, bacon and eggs and maybe try my hand at a lemon cane.

05 November 2010

Christmas Girl


As Christmas seems to be just around the corner... and it just seems to be getting here earlier and earlier by all the Christmas bits and bobs that seem to appear right after Christmas at the stores.  I was kind of thinking maybe this year I'd create some Christmas ornaments and characters and give them to the family, which to me is more special than buying something at the store.

So again I went surfing on YouTube and found another video how-to and watched how they put together a little Christmas elf.  I went ahead and created one myself with my own little twist to her to make her my own.

Making and shaping my little Christmas Girl


Slowly came together but I decided to give her pigtails


My little Christmas Girl

04 November 2010

My attempt at Wall Art

I'd seen some really awesome work at Joe Hurry Creations of one Fimo clay artist Kirsten from Quernus Crafts to do with some 4x4 tree designs.  So I thought I'd give it a try myself as many of the walls in my home are very bare... why not fill them with beautiful art.

Here's my first attempt.

It took me a bit of time to try to come up with a background, but I mixed some
White, Dark Green and a vivid Blue and voila... a swirling crazy
background.

03 November 2010

Cute Polymer Clay Goth Couple Part II

As it goes a Cute Polymer Clay Goth Couple ... isn't a couple until I created the little goth guy.  So I spent last night working on him and here's how it went!

Slowly he's coming together, I put together the body and made
a little vest and jacket lapels... not too shabby!

An over the top view of my attempt at hair....

My little Goth Guy with bowtie and nifty hat

It may not look like it but on his little hat I put two black
hearts to match the look of the little Goth Girl
When I put the little Goth Guy together I didn't even really think how he would look beside the little Goth Girl.  I didn't really look at how big (or how little) he would be next to her... maybe not the best way to put the two together but at the end they actually look pretty darn good together if I do say so myself!

... So happy together!

02 November 2010

Cute Polymer Clay Goth Couple


I found this video on YouTube and thought they were really cute and so I thought I'd give it a try to see if I could make a cute little goth couple of my own.  In total it took me about 1/2 an hour to make the little goth girl.  I've not yet attempted to make the boy... that I'll save for another time.  Since I've never made a character before, I think the little goth girl turned out pretty well.

Here are some pics of what I've done...


Here I've got Goth Girl's body and the start of the frill

A closer look of Goth Girl's body in the works....

Added Goth Girl's head... yes a bit bigger than her body,
but that's my spin on things.

I think she's coming together pretty well.  I'm going to have to
work on my bow making skills... heh.

Here is my version of Goth Girl :)

01 November 2010

In the Beginning

I'm pretty new to the world of Fimo clay ... a nice polymer clay where you have endless possibilities on creating whatever may be on your mind.  The idea that I could create whatever I want out of the clay, well... made me pretty darn happy.  So I went out and bought my clays and bought the cutters and I was ready to go.  I'd seen how people had been creating little food charms and I thought it would be fun to give it a try and see where it takes me.

Well I spent HOURS creating my little designs.  I spent HOURS surfing the net, checking out Google, Flickr, Etsy and others.  I was and still am obsessed with it all.  There are tons of resources on how to create characters, small charms, blending clays to make jewelry... it just doesn't end and the more I write about it the more excited I become about creating something new.

I suppose this was going to be my way of creating and selling what I make, but the more I think about it I'm going to post the great creations and ideas I see... mostly about polymer clay... and maybe a splash of creative design by regular people in whatever takes their fancy and makes me step back and go... "Oh! Pretty!!!". 

I hope you enjoy the blog as much as I will writing in it :-)

LinkWithin

Related Posts Plugin for WordPress, Blogger...