31 January 2011

Bits and Bobs from around the Stratosphere

Mmmm... you look tasty... nom, nom, nom
I've been working on some little dragon-monster looking little cuties this past week.  They were such a hit at my daughter's school, that she ended up making some and handing them out to her friends.  She's gotten so into the clay, that she went an bought some of her own so she wouldn't be getting not what I have for clay.  Very cute... very fun for both of us.

I also so some pictures of little miniature Japanese figurines, so I decided to make my own with some left over clay I had.

I had seen these little Japanese looking girl figurines and decided
to make my own, entirely out of polymer clay... no paint
I enjoyed putting her together.  In a way I'm finding my fun in making these little characters and figurines more so than anything else lately.  I've been looking through Etsy and checking out my favourite blogs on clay and jewelery and loving everyone's creativity, but I'm still trying to find my own little niche.

Also I was thinking about how I might be able to take my love of clay and make it into my own little store/business.  I would be creating one of a kinds (OOAK... see I found out what that meant... finally!) and then selling them on a site like Etsy, maybe get a PayPal account and set up a little site of my own to showcase what I do and sell directly.  I've been reading Itty Biz and really enjoying Naomi's marketing tips and I have always enjoyed her writing style... it's no bullshit.  So refreshing!  LOL.

Totally fun to make, but her little beads on her sleeve fell off...darn it.

I'm thinking for February I might do something like 28 days of love.  Everyday I'll make a little bead/charm and show it here.  It's pretty ambitious for me, since I'm so hit or miss with what I can get done during the week, but it might be just the challenge I need to keep inspired and set in motion my little online shop.

If nothing else... it will be a bit of time to be creative and have fun :)

21 January 2011

Wall and Fridge Art

So even though I've been looking at working on some miniature foods with the awesome books that I received this week, I keep rolling back to doing little bits of wall/fridge art.  I'm not sure if it's just because I find it a bit easier to let my imagination go on these things and it's a lot less finicky... and I'm not so worried about perfection.  I just enjoy it.

So this is what I've been up to this past week.... and it's been fun!


A day at the beach

I have to say I enjoyed my Day at the Beach bit of wall art, because for the first time I made those little palm trees, and didn't reference anything for this picture.  I used old scrap clay for the base and the trunks of the trees and then rolled out combinations of colours to make the ocean, sky and the little crab.  It was fun to make and took a bit of time to put it together, but it was seriously fun  (yes, I know ... it was fun!! Heh.)

My bit of a skyline
 My skyline put together and I threw in a bit of wire to holdup the moon.  It was again placed on some scrap clay and then colours placed over top, outlined in black... throw in some wire and a moon and I think it turned out to be rather fun and colourful.

20 January 2011

The Books are here... The Books are here

This week has been pleasantly awesome... I got the books I ordered through Amazon and flipped through them to see what little wonders I can create and bake and show you.  Ummm... well.  I don't really think my first attempt at what appears to be rather simple turned out all that well. 


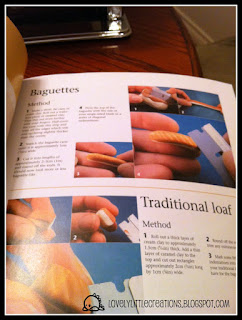
Huzzah... my Miniature Food book arrived and I'm so excited
to get started on learning the tips and tricks to making realistic food!

I really love how Angie Scarr documents her books.  Makes it very
easy to understand and gives really good pictures on how to make
each and every piece.  It even has layouts to make the small
stands and boxes. 

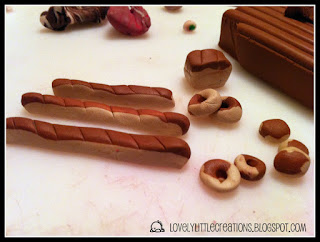
So I thought I'd try my hand a miniature bread.

Hello... bread.  Sigh... in the Angie Scarr book it was to be a caramel on the top, but when I put it together, it just ended up being rather dark looking in comparison to her's.
Miniature Bread... first attempt

I'm not really loving the french loaves, loaves of bread, bagles and buns
Of course I realize that this is my FIRST attempt at miniature food and following what Angie laid out in her book.  I have to say I really like how she's decribed everything step by step and has really good pictures for us to follow.  I'm thinking when she mentioned caramel... I think I might whiten it up... or even make it thinner.  Maybe my interpretation of wafer thin caramel... wasn't her take on wafer thin, as you can see - I think it's a bit too dark and my french bread got a bit out of control, portion-wise.

My version of "fruit cake"... ummm... minus the fruit :-)
Yes, this is another attempt out of Angie Scarr's book, she made a very beautiful fruit cake, which had poppy seeds in it and some real seeds on the top.  Since I had neither of those types of seeds in my kitchen, I went without the poppy seeds and made some polymer clay looking seeds for the top.  I'm not hating this one... in fact I kind of like how it turned out.  I have come to realize I need to get myself a course sandpaper to help me with my texturing, in this case I used one of my pins to make the little holes.


I'm actually pretty happy with the way this turned out
My attempt at miniature breads
So I've got this book and 3 other books to go through for my polymer clay adventure that this is going to be.  I'm excited.  Lots on miniatures, not so real miniatures for jewelery and a bead book.  I don't know how I'm going to put it all into my extra time (... and where I'm going to find the spare time?!?!) to get things going again as I'm very aware it's been very quite here on the blog!

09 January 2011

Hurray... I found out how to make a Skinner Blend

For the life of me I could not figure out how to make a proper Skinner Blend.  I've tried a couple of times, and each time they've turned out as just one colour, not that nice blended colour it's suppose to be.  I didn't take an pictures of my dismal FAIL on the skinner blend, but I found a really awesome site called CraftEdu.  It's got loads of great tutorials ... for a price.  I know getting into a craft can be a bit expensive, and it might get just a bit more with the variety of projects available here for Polymer Clay.  They even have a really good selection of bead jewelery lessons as well.

I found a free tutorial by Donna Kato on how to make a skinner blend.  I have to say now that I've seen the video on how to make one... it makes a bit more sense as to why my colours just ended up being just one colour instead of the blended.  I wasn't overlapping my clays.  Every other tutorial I'd read online had pictures, but I totally gapped that they had to overlap until I saw Donna's FREE (I'm all about the free things!) video on how to make a Skinner Blend.  The link is here: CraftEdu - How to make a Skinner Blend.  Donna has another free tutorial on how to make a Skinner Blend Bullseye Blend too is very good as well, since I'm still trying to figure out how to make clays blend and the last couple of attemps have been more than a bit frustrating.

I've also found myself rather frustrated over making a Strawberry Cane.  I did eventually find a pretty good tutorial on making a Strawberry Cane and a Kiwi Cane, this one isn't in English but with the pictures I don't think you need it to be to be able to make one.

I'm still waiting on my books from Amazon and I hope they'll be here by the end of the Week so I can get started on making some miniatures and maybe take a course or two from the CraftEdu site, I saw some fun rings that Donna Kato had made from some of the Skinner blends that she had put together that look pretty fun.... along with a million other things to add to my "Polymer Clay Bucket List".

06 January 2011

Pretzels!

I decided to get back into the Polymer Clay Cookbook that I'd picked up a while ago and try my hand at making another little food treat.  This time it was Pretzels!  I think they look pretty good for a first attempt... although I think I have to look for a more brown type of finish to it...not bad but maybe a bit more "cooked" looking may not be a bad thing....

Mmm... Pretzel Charms!
I added some "salt" (small white bits of clay) to them after this shot and I do have to say for a first time it was a pretty good turn out.  I think I'm going to try a bracelet with hotdogs, pretzels, pop, and maybe some other similar foods.  We'll see.
What I'd like to do next is try to make a polymer clay cane.  I have the instructions on how to make an orange cane in the Polymer Clay Cookbook... and I've seen some YouTube videos on it.  I even came across Angie Scarr's website and she has a good little tutorial on how to make some very realistic miniature oranges too.  Now I'm really looking forward for those books I'd ordered to come in, since a couple are by her!

On a completely other note... and totally off topic, I take my pictures with my iPhone 4.  The other day I bought an app called Hipstamatic, which has different old film types and lenses to choose from... and here is the results... old school baby with a gratuituous shot of my cat.

Going Ol' School on this pic of my kitty

05 January 2011

Into the New Year

Over the brief holiday I had this year (oh do I wish it was longer!)  I was messing around with my clay and trying my hand at some of the things I'd seen online ... no, I wasn't feeling overly orignal by any stretch of the imagination... and I tried making one of those beads I'd found in my Flickr roamings.... only smaller and well a bit more mashed up than the original I'd come across.

Here is a ball of some old scrap clay that I figured would work well
as my shape when I placed the coils of clay around it to make the bead

Using the Extruder I got for Christmas I made a nice coil of purple
and wrapped it around the scrap clay I had.  I then flipped it over
as I'd put a hole in the top and made it a bit bigger to fit
the clay I planned on putting in it.
  
I had thought of trying my hand at making them beads, but I just haven't quite got the knack of making them without squishing the bottom of one end as I wrap around the coil.  So I decided to make it a little plant pot instead.  Why?  Because I'd been on the hunt for some miniature flower pots, and I did find some online but at this time I can't be ordering new things online (money, money) and so I decided to use the resources I had and improvise.


My improvised tree that I made out of my bead

I'm not sure how easy it is to see what I did here, as I've got a bit of "stuff" in the background of this shot, but I liked how it turned out, so much in fact I tried my hand at another bead and made a twisted up little plant with flowers sticking out of it.


A little potted plant with some funky pink flowers

Pretty little tree and potted plant

It was fun to do and I really felt free when I was making the little plant.  I don't know if free is quite the right word to use, but I felt relaxed and felt like I was really in my element and enjoying the moment.

So much so... you can see in the background some little birds I'd made.  Inspired by some creations by JooJoo (who does great work!)

Little birdies

I just felt liberated and enjoyed the moment of just being able to create and not getting frustrated because something didn't look right.   Actually it went rather smoothly all in all... lol.  I think I'll make some more little plants because I had so much fun making the two I've shown you.  I don't know, one minute I want to make miniature foods and the next I want to make cute little plants and animals, jewelery and mastering how to make a Skinner blend.  SIGH!!!!  It's coming together, and the thing that is most definite is that I'll have a hard time getting bored with clay... too much to get into!

LinkWithin

Related Posts Plugin for WordPress, Blogger...