29 July 2011

Taking a moment

I've been away... and totally not claying or being remotely creative over the past little while.  I think with the pressure of work, family and my "studio" being the kitchen table, my ability to get anything remotely creative accomplished has been lackluster to say the least.  Also my computer is continually conking out on me and it's been a pain in the butt.

I have to say that I did manage to get some crafting retail therapy in over the weekend... I was so pleased with myself.  I took the family to Michaels and had a blast - I bought enough clay to last me quite some time and it was even more awesome by the fact that the clay was 50% off!  Holla!  I bought a few more things at the store, stamps, pearl luster (I see it around... had no idea I would find it in the stamping area... gah!), and I stopped by Chapters to pickup a Moleskin book for my drawings and "creative" moments that I felt I should write down.  I also stopped by Staples to pick up some watercolour pens.  Ohhhh.. I'm all ready to get my creative on.  I've just got to find the time to myself to do it (which is WAY easier said than done).

So seeking a little inspiration as to what to put in my Moleskin book.... to put into effect with clay I decided to stop by Illustration Friday.... which this week had the word: "perennial".  Now my mind goes straight for flowers... but I wanted something different and I went through what others had come up with for the word and for the life of me, that word Perennial... gave me ziltch for inspiration.  I'm hoping that this Friday will give me something more to work with because I was an empty empty woman when it came to being inspired by this week's word.

This past week I've been looking online for some ideas, inspiration and just an opportunity to be uninhibited and just enjoy creating.  I stopped by Fun Clay and they had some "how to's" on creating little characters.  I gave a whirl to the bird... and enjoyed it so much I made two!

Crazy little birds... I had fun making them

31 May 2011

New Books!

New Books for Polymer Clay and Jewelery Design!
Oh you have no idea how excited I was when the Purolator man came by and dropped off my books!  I got them on Friday and I ripped open the boxes I received (thank you Amazon.ca!!!).  I am so excited to get into more Jewelery making with Polymer Clay... learning a few things from Donna Kato and her Polymer Clay book and some Sherri Haab jewelery techniques.  I have to say that the little sea urchin rings sold me on the book!

I'm hoping to get a few projects up and running and hey, maybe even completed while I have a few days off work.  I really like the colourful beads that Donna makes and I'm always wondering about different techniques to make the clay look the way it does when so many talented people make their beads and I'm left going... how??? So I figure once I've got a few new techniques under my belt (hey, even figure out how to make a few polymer clay canes.... without them getting warped when I make them smaller..) I would be so stoked.  Maybe get a few more items into my online store... and finally get my Etsy store up and running.

I'm excited to get started and I'm really going to try to make some time to get creative and get the crazy work life out of the way... because that does nothing but make me mad.  So out with the negative and in with the good vibes.... seriously.

30 May 2011

Illustration Friday: Asleep ... Part II

Illustration Friday: Topic ~ Asleep
Well I thought I'd be spending a bit more time on creating my little sleeping kitteh in clay... but in total it took about 3 1/2 hours and most of it was for making the green carpet under the kitty.  Each of the little tips of the carpet were hand rolled and made of various sizes... and I did it all while watching Harry Potter, so the time went by and it was a fun little project.

I decided to throw in a ball of yarn that the kitteh played with and then got so tired that she needed a nap on the squishy chair.  I really enjoyed myself making it and gave it to my daughter once I'd snapped a couple of pictures of it. 

My Muse.... Sweet Fluffy Kitteh

27 May 2011

Illustration Friday: Asleep

Illustration Friday :: Topic ~ Asleep
I've been wanting to try my hand at Illustration Friday for a while and if you've been reading this blog, you've seen the Illustration Friday icon on the sidebar navigation.  Have I yet had the time to get a little creative with the ideas that come up weekly.... well.... no.  BUT!!!  Today I decided I'm going to do, as I've got a few days off and I plan on enjoying them (and not just spend the entire time cleaning and puttering and generally wasting time until I have to go back to work).  Well, that's the plan anyway.... so I'm going to put together a little clay creation of a sleeping kitteh in a funky chair with some crazy shag carpeting.  Have I ever attempted anything like this before?  Nope.  So it should be fun, challenging and hopefully not too frustrating...

  I put together the illustration in Fireworks and I have to admit since I've been away from doing anything with graphics for almost 3 years.. getting back into it is challenging.... what use to come pretty naturally is SO NOT the case.  I put together the illustration above using Adobe Fireworks.  I love that program.  It just doesn't feel as bulky as Photoshop and Illustrator... and has always been my preference when putting together graphics, editing photos, and general illustrating that have an opportunity to do.  I'd like to get back into making graphics and even trying my hand at creating web templates or something like that.

I'm getting way ahead of myself on that topic... for now I'm going to enjoy making this little clay creation.  Wish me luck!

18 May 2011

"Sinful" Cinnamon Buns

So after coming off a pretty successful Homemade Buns experiment in baking I decided that my sweet tooth couldn't be ignored... and what better than to try making some Homemade Cinnamon Buns...mmm.  So this is the first time I've ever tried making homemade cinnamon buns, so I didn't really know what to expect and I did find it a bit of a challenge to find a recipe that didn't involve a bread maker or a big-ass blender with dough attachment thingy.   Blah.  But I did find the cinnamon bun recipe at Cooks.com and it didn't require any equipment I didn't have and apart from waiting for the dough to rise... it was pretty easy.

The recipe:

4 1/4 to 4 3/4 c. all-purpose flour
1 pkg. active dry yeast
1 1/4 c. milk
1/4 c. granulated sugar
1/4 c. butter
1 tsp. salt
2 eggs
6 tbsp. butter, softened
1/2 c. packed brown sugar
2 tsp. ground cinnamon
1 recipe Maple Nut Glaze or Powdered Sugar Glaze

Step 1: In a large mixer bowl combine 1 1/2 cups of the all-purpose flour and yeast. Heat the milk, granulated sugar, the 1/4 cup butter and salt just until mixture is warm (120 to 130 degrees) and the butter is almost melted, stirring constantly.

Step 2: Add milk mixture to flour mixture; add eggs. Beat with an electric mixer on low speed for 30 seconds; scrape sides of bowl constantly. Beat on high speed for 3 minutes. Using a spoon, stir in as much of the remaining flour as you can. (Dough will be soft.) Turn dough out onto a lightly floured surface. Knead in enough of the remaining flour to make a moderately soft dough (3 to 5 minutes total). Shape dough into a ball.
 
Step 3: Place dough in a lightly greased bowl; turn once. Cover; let rise in a warm place until double (about 1 to 1 1/2 hours). (The dough is ready for shaping when you can lightly and quickly press two fingers 1/2 inch into dough and indentation remains.)
 
Step 4: Punch dough down. On a lightly floured surface, divide dough in half; shape each half into a smooth ball. Cover; let rest for 10 minutes.
 
Step 5: On lightly floured surface roll half the dough to 12x8 inches. Spread with 3 tablespoons softened butter. Combine brown sugar and cinnamon; sprinkle half over rectangle. Roll up from a short side. Seal edges. Make a second roll with remaining dough, butter and sugar mixture.
 
Step 6: Slice each dough roll into 8 pieces. Arrange slices, cut side down, in a greased 13x9x2 inch baking pan. Cover; let rise until nearly double (about 30 minutes).
 
Step 7: Bake rolls in a 350 degree oven for 25 to 30 minutes or until light brown. Invert at once onto a wire rack. Cool slightly. Drizzle rolls with Maple Nut Glaze or Powdered Sugar Glaze. Serve warm.
 
Makes 16 rolls.

MAPLE NUT GLAZE:

In small bowl combine 1 cup sifted powdered sugar, 2 tablespoons maple syrup or 1/2 teaspoon maple extract and enough water or milk (2 to 3 teaspoons) for drizzling consistency. Stir in 1/4 cup coarsely chopped pecans.

POWDERED SUGAR GLAZE:

Combine 1 cup sifted powdered sugar, 1 teaspoon vanilla, and enough milk (about 3 to 4 teaspoons) for drizzling consistency.

FREEZING AND REHEATING:

Bake and cool rolls as directed, do not glaze. Wrap in moisture and vapor proof wrap. Seal, label, and freeze for up to 3 months.
To reheat in a conventional oven, wrap frozen rolls in foil. Place in a 350 degree oven for 20 to 25 minutes or until warm. Drizzle with your choice of glaze.
 
To reheat in a microwave oven, wrap 2 of the frozen rolls in microwave-safe paper towels. Micro-cook on 100% power (high) for 1 to 1 1/2 minutes or until warm. Drizzle with glaze.


Letting the dough rise... waiting to knead it


Rolled with cinnamon and brown sugar.  I added some with raisins... yum.


Baked up and now waiting for some powdered sugar icing

Yes... they were dee-lish and completely gone in record time
Yup, they lasted 2 days and they were gone.  They were a hit here and I gave some to my Mum and Dad and they said they were really good.   So two sets of thumbs up on this recipe and if you have the time and feel like getting right back to the basics and making food that is truely done by your own hands - this recipe isn't hard... just a bit of waiting for the dough to rise.  After that part is over with - the fun part for me began.... loved putting it all together and even better when everyone loved them.

17 May 2011

Hiding out in the land of Homemade Buns

Wow, I can't believe it's been over a month since I posted here... my bad.  I've been busy creating new beads, pendants, focal beads and just basic faffing around... is that a word?  ANYHOO!  Lately I've been baking like a mad woman.  I'm not sure what it was that made me feel like I just HAD to do it... I just really wanted to make something with my hands and I guess I was a bit fed up with feeling like I was getting nothing accomplished.

The other day I had a wicked craving for homemade buns.  I didn't have to look far and I found a really good recipe from a most unexpected website.  I found it at Expecting Mom... and no I'm not expecting a baby.. just some awesome buns!

Yummy Homemade Buns!

The recipe from the lovely Mom Mom on the Go:
Ingredients
1 1/2 cup of LUKEWARM water
4 TBS sugar
1/4 cup oil
1 egg
1 TBS yeast
1 TSP salt
4 cups (or so) flour
Now lets get mixing.....
Take the lukewarm water and place it in a nice size bowl. My Mom always said that the bowl should be a special one because the bowl that the dough is mixed in helps make the bread good. I agree with this and so I always mix my bread in my Royal Worcester large mixing bowl. Superstition I guess! Also, make sure the water is lukewarm.....too hot or too cold will make the yeast not work as well. 
With the lukewarm water in your gorgeous bowl, put in the 4 TBS of sugar, the 1/4 cup of oil (vegetable is what I use) and 1 egg. Mix all that together. I use my whisk and get it all good and mixed up. 
Now go get that TBS of yeast and sprinkle it over your mixture. Let it sit for a few seconds and then just gently mix it all together with the whisk. Don't get all excited and kill the yeast mixing it too hard though! Now put the 1 TSP of salt in the misture and gently mix it in again with your whisk. 
Now we are ready for the messy part to start.....so far so good and easy though right?!
Take a cup of flour and pur it in the mixture. Get a plastic or wooden spoon and stir it in. Once it is mixed well add another cup of flour and mix it too. Sounding repetative, but grab that third cup of flour and pour it in there and mix it in as best you can. Ok now you have to ditch that spoon cause it just will not be able to mix well enough anymore.
Get two more cups of flour ready in a measuring cup on the counter beside your bowl. I know I said it only takes cups of flour, but it usually takes a wee bit more than that to make the mixture perfect. 
Add a fourth cup of flour and mix with your hands. You should have a cup of flour still in the measuring cup sitting beside our bowl. Now we are having fun and we are also at the important part. You have to mix that dough with love. Get it all nice and mixed evening and together. You probably have dough stuck to you hands and that is a sure sign that you need to reach over and grab that cup of flour in the measuring cup on the counter and put a BIT in. Do not put the entire thing in. Mix in a bit at a time until the dough is smooth and you can handle it without it sticking all over our hands.You will now when the dough is perfect because it will be smooth as a baby's bum. 
Now put the dough in the special bowl. Put some oil or melted butter, whatever you prefer, into your hand and rub the top of the dough you have placed in the bowl. Cover it with a clean dish towel and let it rise for 15 minutes. 
After 15 minutes go punch that dough down. Pick it up and knead it a bit and it should feel smooth and you might even hear some air pop out of it. Perfect! Now get your non-stick pan out and grab chunks of dough and roll it into smooth balls. Make the top look good, because any cracks will be seen on the top of the bun when cooked. I like my buns smooth! Make the buns whatever size you want. I like to make 12 buns with this recipe because I like a good sized bun. As you have each one ready, place it in your non-stick pan. once all of your buns are in their pan, then get your oil or melted butter again and rub the tops of the buns. 
Now cover the buns with a clean dish towel and let rise for one hour. When you return in an hour, your buns should have grown and look awesome. 
Preheat the oven to 350 degress F and when ready put them in the oven for 18 to 20 minutes. You will know that the buns are ready when the tops are a nice golden brown. Take them out when ready and get them out of the pan and cooling on a cooling rack. 
There you have it.....amazing buns.

 .... She's totally not kidding.  They were substantial - to the point that I only needed one for my lunch.  They weren't heavy but just enough to make me feel like homemade was the way to go and seriously where have the been all my life!  If you give the recipe a try I'd love to hear about it - and I'm sure if you popped by Mom Mom on the Go, she'd love to hear about it too.

Risen to puffy, squishy goodness... now off to the oven!


Fresh out of the oven


So good I just wanted more.. but I was soo full after one

15 April 2011

A weekend of beads

Since getting my butt in gear to get myself a domain name, hosting and a WordPress theme for a jewelry site.... I then went and got my Etsy store created and added some graphics.  Now this is where I've been sitting for the last week.  Almost done, kind of.  I've found the theme I've purchased to be a bit of a challenge.  Not in "it's impossible" sort of way... it's just a freakin' slog to get  through with the setup.  Once it's done it will be awesome - I'm just the type of girl who wants all the hard bits done... now.


This past weekend my hunny made some beads for me for the jewelry site and I did some as well.  I really feel though as I'm making my beads that my creativity is put under the microscope.  It's like I want perfection, even though that doesn't necessarily have to be.  I just don't want them looking like crap and then no one likes them or buys any of them to add to their jewelery designs.

OHHHH the pressure.  I'm thinking that tomorrow I'm going to try carving into some polymer clay and the bake it and see if I can create a sort of mold that I can use for my beads and then then try painting them to give them a worn/old look.  All of that is new to me and I made an awesomely craptastic bead earlier this evening that I can't even bring to taking a picture of and showing you... it was THAT BAD!  LOL.

Ah well, I'm hoping to have a few more beads done this weekend and then make the brave leap into the world of Etsy.


Pretty Red beads

02 April 2011

All Business Weekend

That sounds pretty important doesn't it!  I finally decided on a name for the website that I'd been contemplating making for a while now and I set up my Etsy store too!  It's been busy - and I managed to get some absolutely fabulous images for the Etsy store from Erin Bradley Designs.  From the experience I had with her, I would recommend her and her quality of work to any one thinking of sprucing up their Etsy store or if you would like a unique look for your store, check out her designs!  I think I must have spent hours looking through the different templates she has available and what really caught my eye (and there were a lot!).  I just want my store too look as friendly as possible and give the look that I'm serious about my work.

So that also spilled over to me working on my bead website.  OMG.... I have been so long out of the loop of web design it is seriously hard to get back into it.  I have that feeling of "I've forgotten everything!" and I can't say that it feels all that comfy.

So today I've spent the last 3 hours working on my jewelry website and I feel like I've not really accomplished as much as I had wanted.  The site itself will be running through WordPress and I am using the Jewelry theme I found a bit earlier.  Holy crap there is a lot to this theme and setting it up... as it has ecommerce in it - so PayPal has to be configured, shipping and handling... and all the not really fun stuff that goes with it.  Unlike the more creative part of writing up a bit of a story to go with the beads that will be on the site and taking the pictures, which I like to to WAY more than the back end stuff.

At the end of the day it will come together and when it's finally up and running I'll share with you the website and the Etsy site that I've made.

Phew!

27 March 2011

Hunting down a Domain Name

For the past couple of days I've been on a search to find a domain name for me to put up a website and add my little crafts.  Am I having any luck?  No.  Not so far.  I've tried:

  • LovelyLittleCreations.com
  • Anything that has to do with the word "Clay"
  • I've even tried some with "Raven" in it because I like Ravens... and then added "Clay"
  • Anything "Clay" with the words "Cottage, Studio"
  • "Doodle Bug", "Doodle Bug Studio" was taken
It's been frustrating to say the least.  Then I went to Etsy to see what other lovely clay artists have done... and it's been mostly their name and clay beads, or some cute concoction of their names/beads/studios/etc.

I'm frustrated... can you tell?

Maybe I'm over thinking it a bit, but I would like something short-ish in a name, no dashes in the domain name and something cute I can put on my cards when I'm selling my bits and bobs.  I really do feel like I'm overthinking.... and I think my mind went to the birds when Lovely Little Creations was taken.  GAH!  So it's like starting all over again and then I'm in a bit of a panic... do I now start another blog.... keep this blog for the stuff I'm doing... am I going to lose it all and close shop before I even try opening one.  SIGH!!!!

Well, I'm not going to give up... I'm just going to have to put my thinking cap back on and come up with something that I like.

20 March 2011

Little Birds

I have been spending a bit of time this weekend drawing up some ideas for projects I'd like to try.  I was also talking with my hunny about starting to sell some beads and things I make online, he's all for it!  I think so far it's been pretty productive... and surprisingly relaxing this weekend.  I've just decided to be mellow... and let creativity happen when it happens.  Also I've been staying away from playing on my iPhone which I have a tendancy to do when I'm bored and watching TV.  Strange how I seem to multi-task those two together.  Instead I've spend the weekend picking up a pencil and drawning in my book.

One of my little creations I had thought about making was 3 Little Birds.


Three Little Birdies in Shadow Boxes
 I thought I'd make little birds and place them in shadow boxes and give them unique backgrounds and see how it went.  Trees with flowers, a sunny sky and some paper cut out clouds.  As I was working on my little birds I've decided rather than placing them in 3 separate shadow boxes, that I'd just put them in one.  I think it just was due to the size that I'd made them... thought they'd look better all together.

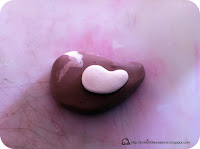
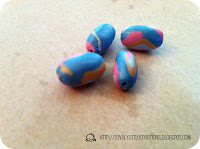
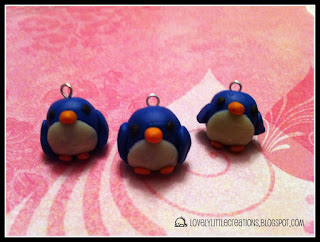
The Basics of the Birdies I started to create
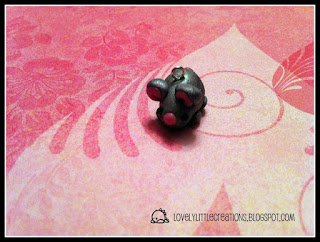
 I started out with three bird shapes.  One in a blue, one pink and one brown.  I had wanted a more red looking bird, but the mixing took it to a pretty in pink and I had some leftover pink that I was able to encorporate in the design of the pink bird which made me pretty darn happy.  That clay I had was from one of my earlier canes that I had tried to make when I first started.... back in November!


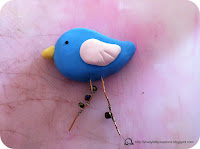
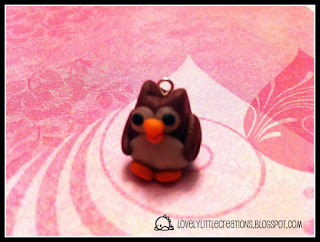
First Birdie... I wanted to wire wrap it's
legs to give it a bit of pizazz.

Having never wire wrapped anything before I thought I'd give it a try with my first little birdie.  I took some thicker bronze wire and wrapped some silver around it to make it stand out and then placed some beads on it to make it look a little more interesting, while keeping the bird itself very straight forward and minimal in design.


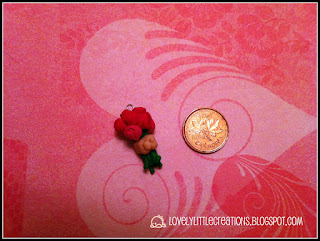
Little Pink Birdie... the beginning of
something beautiful!
 Starting this one's little head design... not quite sure where I wanted to take it, I was thinking of placing a little flower on a wire stem and putting it on it's head, but it just didn't look quite right so I decided to encorporate several wires and let it kind of look more like a mohawk.

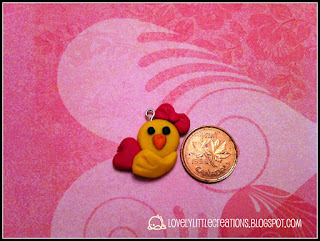
My little pink birdie with it's
 unusual mohawk :)


Here is where I got to encorporate the older cane that I had made back in November for the chest piece on this little pink birdie.

As I was showing my hunny ... he thought it might look good in a flower pot as well as the shadow box I was planning on putting it in. 

See.. so many ideas!  I can't help but get excited to think that there is so much I can get my hands into....that sometimes it's hard to focus on just one thing!

A decorative little pink birdie


Encorporating the old cane, kind of made my day because I have it in my box of clays... wondering if I'd ever had any use for the stuff, and there you go.  Making it a bit more pretty and decorative.


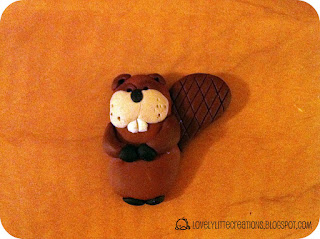
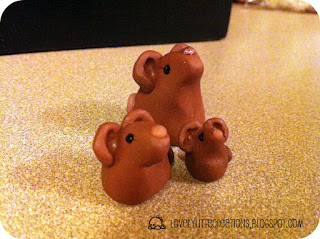
My very decorative brown birdie

It was a bit funny with the last birdie.  I was sitting thinking what I could do with this one that I hadn't done with the other two.  I figured I didn't really do any tail feathers on the other ones...so I ended up improvising a bit and make some green decorations with some wired feathers. 

I was thinking if I had actually made it long enough, but I like how they've turned out.

The Shadowbox... before the magic.  LOL.

The potential shadow box that I'll be putting my little birdies in once they've been cooked up and I've found a proper background.  I'm thinking of placing some scrapbooking paper in the back... maybe a nice light blue with polka dots if there is one, and then I'll add a polymer clay tree with some clay flowers/leaves.  From there depending on room I might add a sun, and some paper clouds that I'll glue in there.... all depending on room.  I was thinking of maybe rather than doing a polymer clay tree branch I might try putting a real one in there and then glue/wire in the flowers..... I'm not sure yet.

But I think so far I'm liking the little birdies I've made.  I'll cook them up later this afternoon and then when I get a chance I'll start building up the landscape.  Maybe a bit of dirt, grass, rocks... all in clay to give it dimention and depth.

From there I think it will come together.   I'll glue in the birds to the clay...since I'm not sure how well something like this would bake in an oven and I don't really want to risk it.

So there you go.  My afternoon delight... and I think I'm going to call it a day as my back is starting to ache from being bent over those birds!  But it was fun to get creative as I've not been drawing anything for yonks.  I need to get back into the happy... and today puts me off to a good start.

16 March 2011

Of Mice and Men

Loads of mice... but not a man in sight
I spent some time back in February making some little clay mice... it was mostly to create one that my daughter could give to her friend at school... out of the three little mice she took the middle one.  The big mouse as a decidedly sparklie nose which I thought added that special charm to him... and now the mice are sitting at my computer desk looking up at me.

Cruising by way of The Mini Food Blog I found the website I found the link to TinyHands (her site is quite awesome). Who in turn has some really fabulous work and a new website... and because I have a love/hate relationship with my past job experience as a graphic designer I almost had a heart attack when I clicked on the link to a WordPress theme designed for selling jewelery and well... anything charm-wise...basically what we do here at Lovely and can use it on this theme.  Oh My God... seriously I'm getting giddy just thinking about the possibility of having my own little shop on the web. Check out the really awesome looking WordPress theme for a Jewelery Shop... here.

I have to say I've been rather lazy with my clay work, jewelery work, or basically anything crafty for the past couple of weeks.  I'm not sure if it's a case of "I have too much on my plate at the moment... excuse me..." or if I'm just generally procrastinating, realizing that my workspace that is the kitchen table just isn't really cutting it.  It got me thinking today to go hunt down a cheap second hand table (or just cheap table) for me to setup my clay stuff and well all my craft stuff I've got wedged in my kitchen cupboard and feel like I have a place of my own to create.

See... start a website, sell my stuff, get a table... it's swirling around and I feel almost paralized to do anything.  Ask me why... I really don't know... maybe it's the roadblocks I place in front of myself that I never get anything accomplished.  Maybe it's time to change that and get excited about making a change, making cute charms, beads, jewelery, stuff.... just get something going that I love to do.

Good times :)

06 March 2011

Missing in Action

Yeah, I'm not exactly sure where all the time went but before I knew it February was over and I'm rolling through March already.  What just happened???  LOL.

As you can tell my 28 days of charms didn't get very far... 12 days... hmmm.  I realized that I just am not working that well under that kind of pressure... haha.  Well, it's self imposed but you know I did manage to do a few things while away from this blog.

My first little adventure was to make some homemade lasagna and I have to say that I really enjoyed making it.  Its from a recipe my Mum gave me and it reminds me every time I have it of her and Christmas time... it just seemed that it was that time of year that she would make it and it was so yummy ... and it never seemed to be enough.

Well, I can get 8 big slices out of it and I have to say that it does a great job in a pinch when I have to make supper during a week night when we're super busy.

This night that I made this Lasagna I also made a caesar salad and made some garlic bread - all on the super easy pre-made/pre-packaged kind, as I know me and I'm not going to want to make all the extras after putting in the time with the lasagna - I just want to get it done and eat it - and enjoy the time I have with my family over some good food!

Well, I don't know if it was something in the air or in the water, but I didn't stop there.  My hunny really wanted some Maritime Brown Bread as he can't get it out here on the west coast.  So we looked online to see if there were any stores...anywhere nearby that had it - nope.  Dempsters makes it, but nothing available... so being that we were out of luck to buy it pre-made, he found a recipe online to try.

The House of Simon had the recipe - THANK YOU!! and we put it together and baked it up and it turned out absolutely yummy!  I cut myself some big door step slices, but some butter on it... and as that melted into the warm bread I put some jam on it.... and wow!  That is all I have to say about that.  It is a great little recipe and if you have been to the Maritimes, or have someone in your life who just misses that sort of bread... try the recipe... you won't be disappointed.  I mean if I can do it, anyone can!

So between working, baking and cooking up a storm I've not had a heck of a lot of time for my crafts.  My polymer clay is in the cupboard and my paints are on a shelf... my jewelery making bits and pieces are also away in a closet. 

Its not that I don't want to get back into my creative mode it is just feeling really hectic... and I"ve been tired and a bit unwell over the past week.  That lovely cold/flu is going around work and school so we all got slammed with it.  Oh the good times!

I think fluffy kitteh knows were all not feeling so well because she's been very clingy.  Which I love... because I'm a softy and I love to smoosh my cat :).

12 February 2011

A Charming Day Eleven

Lovely Little Sweater
I had fun making this little charm.  I think I have to work on the lighting of the shots, as I've added a bit of detail to it that this picture doesn't bring across.  By far one of the fun charms I've had to do so far.  My little lovely sweater, just about the size of a penny and I figure it would make a cute bracelet charm or cell phone charm... I might even try making a pair of earrings from it.... now just to make another one like it.  Hmmm... maybe the next time I make a sweater, I'll measure it out so I have two of each portion so their both the same size.

A creative wobble

I must have one of those wobbles every couple of days.... I just sometimes get very caught up in the beauty of other fabulously crafty and creative people and their websites and feel like I need to step it up.  I found some really fun, whimiscal sites and I love what they do and their creativity just seems to explode from their websites.  Some I've seen have to do with scrapbooking and I see these women who have whole rooms dedicated to their crafts!  I have serious envy, since I'm working at my kitchen table.

Since the site has primarily focused on polymer clay and a smidge of bead work, I'd love to try new things.  I'd like to get back into graphic design and maybe put out some free web templates for anyone to use, maybe try some digital scrapbooking... maybe even try the hands on kind of scrapbooking where you need to cut things out and glue them!  I'd like to try some more wire bead working and make some fun earrings or a necklace.  I need to find my journal and give myself some time for drawing out some new ideas for clay... or just to draw.  Maybe I'll get into creating Etsy store fronts.... I don't know.  I feel like I want to burst and feel really really restricted.... monitarily - because it takes money to get the programs, the equipment, the foot in the door for Etsy and my budget is pretty tight.  Where there's a will there's a way right??  LOL.

I'm not even sure I should be posting that I'm feeling this way... since most of the blogs I've come across keep it pretty professional and stick to the topic at hand.  I just feel like blabbing and this is my place to do it. 

I figure since it's my blog and my fan base isn't all that huge I won't be insulting anyone or making anyone move away from reading this blog if I happen to splurge and go in a few different directions and then share my little adventures with you.  If you don't like it, wait a couple of days and I'm sure my focus will switch to something different... since I can never really focus on just one thing... ever!


Some ideas I have so far:
  • Create my own website, to blog and sell my stuff
  • Get back into my graphic design and create a free web template
  • Get back into Digital Scrapbooking
  • Try my luck with hands on Scrapbooking... paper cutters and all that good stuff
  • Try making miniature food
  • Create some wire beading and make some earrings
  • *maybe* try a selling at a craft show (it really depends on what I've done and how much it would $$)
It's a start right... and I'm all for trying something different!

11 February 2011

A Charming Day Ten

Whoo, Whoo, Whoo
My first attempt at a little owl charm.  Not the best picture of this little fella.  I ended up using a translucent white on the owl for the eyes...which wasn't quite what I wanted, but for a first attempt at making a little charm... I think he turned out quite well

10 February 2011

A Charming Day Nine

Bunnies!
When I was making these little bunnies on the one on the right I added an innter colour on the ear.  The colour was mixed with a sparklie white Fimo clay... but it ended up baking almost translucent, which wasn't quite what I was looking for.  Both are pretty cute and would make a great pair of earrings I think.

09 February 2011

A Charming Day Eight

Little Blue Birds
On these little charms I actually tried something a little different.  For their white little chests I actually took the clay I was going to use and ran it through the pasta machine to make it one thin layer.  I then took one of my circle cutters to make them all uniform.  You don't know how much easier it was to make them look the way I wanted.  I'm sure for those of you who have been working with Polymer clay for a while... or those of you who are just plain smarter with the clay than me knew that it's always easier when you have a uniform pattern to add.... sigh!  Live and learn :)

08 February 2011

A Charming Day Seven

Lovely little chicky
Looking at some Kawaii sites... they had cute little characters and I thought I'd give my try at a cute little chicky.  I know I've made one previously but it was so cute....Darn those Kawaii sites.  I used polymer clay and some mica blush I had.  Very vivid pink, but it came out quite well on the little chick (which is so nice... considering the mica blush was WAY too pink on me!).

06 February 2011

A Charming Day Six

Feeling a little mouse-y?
I'm not sure I can come up with whitty things to say on each of these little charms I'm making this month.  But here's an attempt at a little grey mouse.  I think it turned out quite well, I think if I make another one I'll have to be a little more focused on making sure my ears are equally seperated ... as I looked at my mouse after baking it and found it was a bit off.  Ah, well... still cute :)

05 February 2011

A Charming Day Five

A little bouquet of roses
This charm I ran with romance and what someone would get for their special someone on Valentine's Day.  In the process so far, I cannot find my little heart cutter... so I'm still a bit frantic about searching for it.  Not exactly a good time to lose it!

I'm also thinking I'm going to have to try putting my pictures in a better lighting setup.  Right now all my pictures have a bit of a yellow hue.  So I think if I ever do plan on selling these charms I'll have to take new pictures in better lighting so the true colours show up.  But I think that's still a ways a way yet.  I have to come up with some charms to fill the store... so far I have 5.  Not enough... yet.  I'm hoping by the end of the 28 days I'll have 28 charms and I'll open my Etsy shop on March 1st.

There's my second goal... March 1st.... open my Etsy shop :)

04 February 2011

A Charming Day Four

Little Sweet Chicky sent with Luv
I seriously liked making this little charm.  I borrowed my daughter's Sculpey Yellow as she had found it baked to a really nice yellow, which I hadn't found with the Fimo I had.  So I think my little Luv Chick turned out quite well... now to think of other little charms.

Any suggestions?

03 February 2011

A Charming Day Three

So I've been busy working on making the charms for my own little goal for February... and somehow in all this love fell a little Leprechaun.  Go figure.  I just felt like making him :)

I was wondering as I'm making these little charms, would you buy one?  If you wouldn't, I'd love to hear why - of course constructive criticism is welcome.. the mean troller type of comment... well, keep that to yourself please and move on to another blog that would like that sort of thing.  But seriously I'd love to hear your feedback!

Lookie Here... a Wee Leprechaun spreading his love. :)

02 February 2011

A Charming Day Two

I have to say when I'm making these little charms, I thought I'd have a ton of ideas.  Seriously.... so much out there that represents love that I was sure I'd have great ideas about making these little charms.  Not, so, much.  I've come up with 5 so far and I'm grasping for other ideas that were to roll with the them of love.  'Tis the month of love, right?

Well I decided to try my hand a Cupid... then after I'd baked it... realized I missed putting wings on the little fella.  So here's the one I've made (minus the wings).  This may give me yet another opportunity to make a nother little winged Cupid charm!

I also wasn't overly happy with the way the little fella's hair turned out, but maybe I'm being to critical.  I think I'll try to change it up a bit on the next little cupid I make.

Little Cupid... missing his wings... duh! :P

01 February 2011

A Charming February

I thought for February I would make some little charms that could go on a phone, necklace, bracelet or even maybe a snazzy pair of earrings. I thought I might try a month of charms that would relate to love ... As it's February ... But I ended up making a few love themes a little leprechaun showed up. How he got there I don't know :).

So here's to a charming month!

Little Love Kitty

31 January 2011

Bits and Bobs from around the Stratosphere

Mmmm... you look tasty... nom, nom, nom
I've been working on some little dragon-monster looking little cuties this past week.  They were such a hit at my daughter's school, that she ended up making some and handing them out to her friends.  She's gotten so into the clay, that she went an bought some of her own so she wouldn't be getting not what I have for clay.  Very cute... very fun for both of us.

I also so some pictures of little miniature Japanese figurines, so I decided to make my own with some left over clay I had.

I had seen these little Japanese looking girl figurines and decided
to make my own, entirely out of polymer clay... no paint
I enjoyed putting her together.  In a way I'm finding my fun in making these little characters and figurines more so than anything else lately.  I've been looking through Etsy and checking out my favourite blogs on clay and jewelery and loving everyone's creativity, but I'm still trying to find my own little niche.

Also I was thinking about how I might be able to take my love of clay and make it into my own little store/business.  I would be creating one of a kinds (OOAK... see I found out what that meant... finally!) and then selling them on a site like Etsy, maybe get a PayPal account and set up a little site of my own to showcase what I do and sell directly.  I've been reading Itty Biz and really enjoying Naomi's marketing tips and I have always enjoyed her writing style... it's no bullshit.  So refreshing!  LOL.

Totally fun to make, but her little beads on her sleeve fell off...darn it.

I'm thinking for February I might do something like 28 days of love.  Everyday I'll make a little bead/charm and show it here.  It's pretty ambitious for me, since I'm so hit or miss with what I can get done during the week, but it might be just the challenge I need to keep inspired and set in motion my little online shop.

If nothing else... it will be a bit of time to be creative and have fun :)

21 January 2011

Wall and Fridge Art

So even though I've been looking at working on some miniature foods with the awesome books that I received this week, I keep rolling back to doing little bits of wall/fridge art.  I'm not sure if it's just because I find it a bit easier to let my imagination go on these things and it's a lot less finicky... and I'm not so worried about perfection.  I just enjoy it.

So this is what I've been up to this past week.... and it's been fun!


A day at the beach

I have to say I enjoyed my Day at the Beach bit of wall art, because for the first time I made those little palm trees, and didn't reference anything for this picture.  I used old scrap clay for the base and the trunks of the trees and then rolled out combinations of colours to make the ocean, sky and the little crab.  It was fun to make and took a bit of time to put it together, but it was seriously fun  (yes, I know ... it was fun!! Heh.)

My bit of a skyline
 My skyline put together and I threw in a bit of wire to holdup the moon.  It was again placed on some scrap clay and then colours placed over top, outlined in black... throw in some wire and a moon and I think it turned out to be rather fun and colourful.

20 January 2011

The Books are here... The Books are here

This week has been pleasantly awesome... I got the books I ordered through Amazon and flipped through them to see what little wonders I can create and bake and show you.  Ummm... well.  I don't really think my first attempt at what appears to be rather simple turned out all that well. 


Huzzah... my Miniature Food book arrived and I'm so excited
to get started on learning the tips and tricks to making realistic food!

I really love how Angie Scarr documents her books.  Makes it very
easy to understand and gives really good pictures on how to make
each and every piece.  It even has layouts to make the small
stands and boxes. 

So I thought I'd try my hand a miniature bread.

Hello... bread.  Sigh... in the Angie Scarr book it was to be a caramel on the top, but when I put it together, it just ended up being rather dark looking in comparison to her's.
Miniature Bread... first attempt

I'm not really loving the french loaves, loaves of bread, bagles and buns
Of course I realize that this is my FIRST attempt at miniature food and following what Angie laid out in her book.  I have to say I really like how she's decribed everything step by step and has really good pictures for us to follow.  I'm thinking when she mentioned caramel... I think I might whiten it up... or even make it thinner.  Maybe my interpretation of wafer thin caramel... wasn't her take on wafer thin, as you can see - I think it's a bit too dark and my french bread got a bit out of control, portion-wise.

My version of "fruit cake"... ummm... minus the fruit :-)
Yes, this is another attempt out of Angie Scarr's book, she made a very beautiful fruit cake, which had poppy seeds in it and some real seeds on the top.  Since I had neither of those types of seeds in my kitchen, I went without the poppy seeds and made some polymer clay looking seeds for the top.  I'm not hating this one... in fact I kind of like how it turned out.  I have come to realize I need to get myself a course sandpaper to help me with my texturing, in this case I used one of my pins to make the little holes.


I'm actually pretty happy with the way this turned out
My attempt at miniature breads
So I've got this book and 3 other books to go through for my polymer clay adventure that this is going to be.  I'm excited.  Lots on miniatures, not so real miniatures for jewelery and a bead book.  I don't know how I'm going to put it all into my extra time (... and where I'm going to find the spare time?!?!) to get things going again as I'm very aware it's been very quite here on the blog!

LinkWithin

Related Posts Plugin for WordPress, Blogger...