Showing posts with label Polymer Clay. Show all posts

18 April 2012

Hiding out....

I've been more than just a bit sporatic with my blog.  I'm still buying clay and thinking up ideas for my next little project I want to do.  I've even bought some website names and hosting for some of the ideas I've come up with... why?  Because I would like to be able to sell some of my creations so I have that extra money to buy more clay... do more creating....

I've just been wanting to get creating again and I've just found that my life in the last little bit was just wallowing in discord... which made it really hard to take a break and get creating because my mind was all over the place.  I hate that when that happens.

Over the last couple of days I've been cleaning up around my place - which was my major discord... I just stopped caring, which then led to a massive mess and I'm soooo not good when things are messy and I was just getting sad and mad - why... I still don't know why I let things get so messy.  I just stopped.  I was ... am ... tired.  So anyhoo, rather than wallowing in my blah-ness I decided to get tidying and in turn I started to feel better and now that I have a clean kitchen table I got back into claying.  I wanted to make a name for my new neice that made her appearance earlier last week.

I made her name out of clay... I hope to have a photo of what I've done tomorrow (see, I'm being optimistic with getting back into blogging!)  I'm still trying to figure out a good way to take pictures of what I've done that looks good as my lighting leaves everything a bit yellow... which doesn't make me very happy.

I think I need to figure out how to make my own lightbox.

I have to say that I really enjoyed working on my little project today for my niece, it's been a long time since I actually set down to do anything with clay or anything creative - It just felt good.  I hope they like what I've put together, I'd made one for my nephew when he was born... that looked like this:

Now that I'm looking at this picture... I'm hoping that the squares I've made are small enough to fit in the frame (I got a great deal on a 3 pack)... I've also made a little flower in a clay pot to add a little more dimention to it.  Fingers crossed it all fits.... or I figure out a "creative" way to make the squares fit!

I'm glad to be back and blogging about what I've been doing and I hope to also get my websites up and running so I can share with you my little adventures in that as well!


04 February 2012

An Hour at Michaels... Priceless

Today the family and I stopped at Michaels, just to browse.  Of course I know I'm only kidding myself when I say that I just want to browse.  My browsing took me all over the store and an hour later... and almost $100 later (I don't know how it ended up being that price...lol) I've got some new ideas to give a try.

Of course I thought I'd do my Ring A Day... which turned out to be one.  I'm terrible at doing anything for any amount of time.  It's like I've got ADD... there are just so many things to do - and my mind bounces around like it's a ball in a pin ball machine.  All - Over - The - Map.  I'm just hoping with my new little purchases ... I'll be able to do a bit more focusing on my clay and start to get back into it.  I've not done any clay work in month...and quite honestly I'm missing it!

I picked up some frames for my clay, so you can hang a few
around the neck, a bird cage, 2 bird houses, some rings, pinheads,
bead / pearling rods some clay and black embossing powerder.

The start to my little polymer clay terrerium
It was quite a a bit of an eye opener when I did get my bill.  I didn't realize what I'd bought would come to that amount... I also picked up some Valentine's Day bits and bobs... so really, I guess it wasn't so bad.

I think my first project will be my little terrerium.  I picked up 2 bowls like this... of course they may get a little dusty because there is no lid, but I couldn't find anything that was enclosed and small - either they were larger flatter bowls, larger more rounded bowls (all of which would be very awesome), but I'm just wanting to do a few mushrooms, toadstools, little home, trees and grass maybe.  I'll draw out some ideas - just to be sure that I don't end up forgetting something... or maybe I'll just go for it and let the creativity go where it wants to.

29 July 2011

Taking a moment

I've been away... and totally not claying or being remotely creative over the past little while.  I think with the pressure of work, family and my "studio" being the kitchen table, my ability to get anything remotely creative accomplished has been lackluster to say the least.  Also my computer is continually conking out on me and it's been a pain in the butt.

I have to say that I did manage to get some crafting retail therapy in over the weekend... I was so pleased with myself.  I took the family to Michaels and had a blast - I bought enough clay to last me quite some time and it was even more awesome by the fact that the clay was 50% off!  Holla!  I bought a few more things at the store, stamps, pearl luster (I see it around... had no idea I would find it in the stamping area... gah!), and I stopped by Chapters to pickup a Moleskin book for my drawings and "creative" moments that I felt I should write down.  I also stopped by Staples to pick up some watercolour pens.  Ohhhh.. I'm all ready to get my creative on.  I've just got to find the time to myself to do it (which is WAY easier said than done).

So seeking a little inspiration as to what to put in my Moleskin book.... to put into effect with clay I decided to stop by Illustration Friday.... which this week had the word: "perennial".  Now my mind goes straight for flowers... but I wanted something different and I went through what others had come up with for the word and for the life of me, that word Perennial... gave me ziltch for inspiration.  I'm hoping that this Friday will give me something more to work with because I was an empty empty woman when it came to being inspired by this week's word.

This past week I've been looking online for some ideas, inspiration and just an opportunity to be uninhibited and just enjoy creating.  I stopped by Fun Clay and they had some "how to's" on creating little characters.  I gave a whirl to the bird... and enjoyed it so much I made two!

Crazy little birds... I had fun making them

20 March 2011

Little Birds

I have been spending a bit of time this weekend drawing up some ideas for projects I'd like to try.  I was also talking with my hunny about starting to sell some beads and things I make online, he's all for it!  I think so far it's been pretty productive... and surprisingly relaxing this weekend.  I've just decided to be mellow... and let creativity happen when it happens.  Also I've been staying away from playing on my iPhone which I have a tendancy to do when I'm bored and watching TV.  Strange how I seem to multi-task those two together.  Instead I've spend the weekend picking up a pencil and drawning in my book.

One of my little creations I had thought about making was 3 Little Birds.


Three Little Birdies in Shadow Boxes
 I thought I'd make little birds and place them in shadow boxes and give them unique backgrounds and see how it went.  Trees with flowers, a sunny sky and some paper cut out clouds.  As I was working on my little birds I've decided rather than placing them in 3 separate shadow boxes, that I'd just put them in one.  I think it just was due to the size that I'd made them... thought they'd look better all together.

The Basics of the Birdies I started to create
 I started out with three bird shapes.  One in a blue, one pink and one brown.  I had wanted a more red looking bird, but the mixing took it to a pretty in pink and I had some leftover pink that I was able to encorporate in the design of the pink bird which made me pretty darn happy.  That clay I had was from one of my earlier canes that I had tried to make when I first started.... back in November!


First Birdie... I wanted to wire wrap it's
legs to give it a bit of pizazz.

Having never wire wrapped anything before I thought I'd give it a try with my first little birdie.  I took some thicker bronze wire and wrapped some silver around it to make it stand out and then placed some beads on it to make it look a little more interesting, while keeping the bird itself very straight forward and minimal in design.


Little Pink Birdie... the beginning of
something beautiful!
 Starting this one's little head design... not quite sure where I wanted to take it, I was thinking of placing a little flower on a wire stem and putting it on it's head, but it just didn't look quite right so I decided to encorporate several wires and let it kind of look more like a mohawk.

My little pink birdie with it's
 unusual mohawk :)


Here is where I got to encorporate the older cane that I had made back in November for the chest piece on this little pink birdie.

As I was showing my hunny ... he thought it might look good in a flower pot as well as the shadow box I was planning on putting it in. 

See.. so many ideas!  I can't help but get excited to think that there is so much I can get my hands into....that sometimes it's hard to focus on just one thing!

A decorative little pink birdie


Encorporating the old cane, kind of made my day because I have it in my box of clays... wondering if I'd ever had any use for the stuff, and there you go.  Making it a bit more pretty and decorative.


My very decorative brown birdie

It was a bit funny with the last birdie.  I was sitting thinking what I could do with this one that I hadn't done with the other two.  I figured I didn't really do any tail feathers on the other ones...so I ended up improvising a bit and make some green decorations with some wired feathers. 

I was thinking if I had actually made it long enough, but I like how they've turned out.

The Shadowbox... before the magic.  LOL.

The potential shadow box that I'll be putting my little birdies in once they've been cooked up and I've found a proper background.  I'm thinking of placing some scrapbooking paper in the back... maybe a nice light blue with polka dots if there is one, and then I'll add a polymer clay tree with some clay flowers/leaves.  From there depending on room I might add a sun, and some paper clouds that I'll glue in there.... all depending on room.  I was thinking of maybe rather than doing a polymer clay tree branch I might try putting a real one in there and then glue/wire in the flowers..... I'm not sure yet.

But I think so far I'm liking the little birdies I've made.  I'll cook them up later this afternoon and then when I get a chance I'll start building up the landscape.  Maybe a bit of dirt, grass, rocks... all in clay to give it dimention and depth.

From there I think it will come together.   I'll glue in the birds to the clay...since I'm not sure how well something like this would bake in an oven and I don't really want to risk it.

So there you go.  My afternoon delight... and I think I'm going to call it a day as my back is starting to ache from being bent over those birds!  But it was fun to get creative as I've not been drawing anything for yonks.  I need to get back into the happy... and today puts me off to a good start.

09 January 2011

Hurray... I found out how to make a Skinner Blend

For the life of me I could not figure out how to make a proper Skinner Blend.  I've tried a couple of times, and each time they've turned out as just one colour, not that nice blended colour it's suppose to be.  I didn't take an pictures of my dismal FAIL on the skinner blend, but I found a really awesome site called CraftEdu.  It's got loads of great tutorials ... for a price.  I know getting into a craft can be a bit expensive, and it might get just a bit more with the variety of projects available here for Polymer Clay.  They even have a really good selection of bead jewelery lessons as well.

I found a free tutorial by Donna Kato on how to make a skinner blend.  I have to say now that I've seen the video on how to make one... it makes a bit more sense as to why my colours just ended up being just one colour instead of the blended.  I wasn't overlapping my clays.  Every other tutorial I'd read online had pictures, but I totally gapped that they had to overlap until I saw Donna's FREE (I'm all about the free things!) video on how to make a Skinner Blend.  The link is here: CraftEdu - How to make a Skinner Blend.  Donna has another free tutorial on how to make a Skinner Blend Bullseye Blend too is very good as well, since I'm still trying to figure out how to make clays blend and the last couple of attemps have been more than a bit frustrating.

I've also found myself rather frustrated over making a Strawberry Cane.  I did eventually find a pretty good tutorial on making a Strawberry Cane and a Kiwi Cane, this one isn't in English but with the pictures I don't think you need it to be to be able to make one.

I'm still waiting on my books from Amazon and I hope they'll be here by the end of the Week so I can get started on making some miniatures and maybe take a course or two from the CraftEdu site, I saw some fun rings that Donna Kato had made from some of the Skinner blends that she had put together that look pretty fun.... along with a million other things to add to my "Polymer Clay Bucket List".

05 January 2011

Into the New Year

Over the brief holiday I had this year (oh do I wish it was longer!)  I was messing around with my clay and trying my hand at some of the things I'd seen online ... no, I wasn't feeling overly orignal by any stretch of the imagination... and I tried making one of those beads I'd found in my Flickr roamings.... only smaller and well a bit more mashed up than the original I'd come across.

Here is a ball of some old scrap clay that I figured would work well
as my shape when I placed the coils of clay around it to make the bead

Using the Extruder I got for Christmas I made a nice coil of purple
and wrapped it around the scrap clay I had.  I then flipped it over
as I'd put a hole in the top and made it a bit bigger to fit
the clay I planned on putting in it.
  
I had thought of trying my hand at making them beads, but I just haven't quite got the knack of making them without squishing the bottom of one end as I wrap around the coil.  So I decided to make it a little plant pot instead.  Why?  Because I'd been on the hunt for some miniature flower pots, and I did find some online but at this time I can't be ordering new things online (money, money) and so I decided to use the resources I had and improvise.


My improvised tree that I made out of my bead

I'm not sure how easy it is to see what I did here, as I've got a bit of "stuff" in the background of this shot, but I liked how it turned out, so much in fact I tried my hand at another bead and made a twisted up little plant with flowers sticking out of it.


A little potted plant with some funky pink flowers

Pretty little tree and potted plant

It was fun to do and I really felt free when I was making the little plant.  I don't know if free is quite the right word to use, but I felt relaxed and felt like I was really in my element and enjoying the moment.

So much so... you can see in the background some little birds I'd made.  Inspired by some creations by JooJoo (who does great work!)

Little birdies

I just felt liberated and enjoyed the moment of just being able to create and not getting frustrated because something didn't look right.   Actually it went rather smoothly all in all... lol.  I think I'll make some more little plants because I had so much fun making the two I've shown you.  I don't know, one minute I want to make miniature foods and the next I want to make cute little plants and animals, jewelery and mastering how to make a Skinner blend.  SIGH!!!!  It's coming together, and the thing that is most definite is that I'll have a hard time getting bored with clay... too much to get into!

19 December 2010

Flickr'd

I joined the Polymer Clay Group on Flickr today and took a peek through the photos that had been added to the group.  Some really caught my eye and I thought I should share my little finds!

Colgantes

Colgantes by Bebe Clay


White Wentworth the Robot Standing next to Pennies & Keys

Flapjack magnet!
Flapjack magnet!

Christmas cookies jewelry set fimo polymer clay

Fun little creations made by some very talented fimo clay artists.  Hopefully by adding my name to this pool of creativity, people will see what I've been doing and check out the website and enjoy what I love to do.  Which is create... and remember what Bob Ross use to say when he painted... there are no mistakes... just happy accidents :)

Christmas Cheer

Since I've been somewhat procrastinating over doing anything for Christmas I spent some time this weekend making a set of Christmas girls.  Now that I think about it, I should have made them with wings.  Cute little snow angels.  But I didn't think of it before I baked them, so their almost like under dressed Carolers... ah well.

I put the girls in the oven to bake and waited the usual 30 minutes and took them out.  Unfortunatley one of the girls had a mishap and instead of losing her mind, completely lost her head.

This girl has completely lost her head!
I tried to put the pin back into her head, but the clay was too hard unfortunatly so I have put her together with some glue.  Hopefully it's enough to keep her head attached so we can enjoy the pair this Christmas.


...after just gluing her head back on and fingers crossed
once the glue drys that she'll be good to go this
holiday season to enjoy.

I also managed to make some Christmas Tree ornaments in green and added them for a little decorative va-va-voom.  I've got some little stars I plan on attaching to the hoop at the top of the tree just to make them a bit different and fun.  Here's a pic of them, minus the stars that I plan on adding.


Christmas Tree Ornaments and my two little Christmas Girls.

05 December 2010

Flowering Field of Flowers

So this morning I tested out my new pasta maker to see if I could make a great looking tile background.  I wasn't sure if I were to run the colours through the pasta maker if it would stretch to the point where I couldn't use it and it would end up being wasted clay... and well I figured I'd try rolling the different colours of clay individually and then cut them together and joint them by blending the clay joints together with my fingers.  I think it started to come together quite well.   From there I debated on what I would put on the background as it looked as great place for a sheep or two.  But I ended up going with flowers.

I thought I would try building a very simple cane of polymer clay to make some funky flowers, because I had thought of having gold trim around the white of the flower and how would I accomplish that best... I thought a cane would do it.

Here's how the process went:

Putting together the layers of polymer clay.  Wasn't
quite sure how to put in the curves of the hills, but
found if I overlapped the fimo clay and then cut
it, it put together a nice flow and then smoothed the
layers together with my fingers.

The background is complete!  It is about 10x10cm

My attempt at my first polymer clay can ever.  It started
to come together quite well.  I went with a black
middle, white around it, then some red and white then
surrounded by more white and then gold.

The finished polymer clay cane.  Looks like a big
shiny cigar.  I stuck it in the freezer for about 10 minutes
so it was easier to cut and would stop the clays from
bleeding together when I cut it.
The finished product... pretty flowers
I have to say I really enjoyed putting the flowers and blades of grass on the background... really enjoyed putting the grass on there.  I found out that my glittery white, wasn't so glittery and more transparent which made the flowers look a bit funky.  So I know if I'm going to do it again, no glittery white effects Fimo, and just plain white Fimo is in order.  But for a first attempt at flowers, I'm pretty pleased and I've got a few more ideas I'd like to try and see how it goes.

21 November 2010

Christmas Tree, Oh Christmas Tree

Yup, I'm crazy.  After making the Santas I kicked it up a knotch and decided to try making some Christmas Trees.  They are made out of Fimo Polymer Clay and I added some little sparkly beads to give it a little sizzle.   They aren't too big, they can be placed on a mantel or a Christmas tree... the choice would be yours to make.  But I thought they were fun... my only worry when I was making them was if I would have enough clay.  Luckily I had both a plain red and an "effect" red that had the sparkles in it.  So I tried one tree of each. 

Here's how they turned out...

I rolled them out... it took about 3 rows of the Fimo Clay to get
my trees to the right size.  I honestly thought it would take
more clay to get the desired look... happy it didn't!

My two trees are ready to be decorated!

My completed little trees.  One with just swirled white Fimo
clay and the other with dots of Fimo and my little jewels
for that added "OH LA LA"
I have to say that I am really happy with the way the little trees turned out.  Now just to add a ribbon on the top so that they can be added a  Christmas ornament... or not, depending on what you want to do with the little ornaments. 

Having just taken the Christmas tree ornaments out of the oven.. I don't recommend baking them with the jewels.  Even though it's a low temperature, it still make the jewels cloudy and they fell off.  So I put some new ones back on with a bit of glue and they look pretty fab-oosh!

Santas, Santas and more Santas

 Well with my new cutting board to use to make my little creations on, I decided to start with some Santas since it's getting closer to Christmas.  I had debated on how many to make and what they might be used for.  Do I create a little Santa character, do I make some charms, do I make some jewelery?  I wasn't too sure, but yesterday I had picked up some earring backs and figured they'd be cute and maybe someone might want to wear them. 

I decided to give it a whirl...

Starting out with my clays for my Santas
I decided I should make them pretty small... but with the detail I planned on giving the Santas I couldn't get too small.  It was a bit of a toss up now as to what I wanted to do, but I decided to stick with earrings.
Santas faces are coming together... slowly!

Now a little personality... faces are done

Here's the completed pair.... HO HO HO

Excuse the dirty finger nails...so full of clay!  But these are
the backs I picked up at Michaels on Friday and I figure
I'll make a pair of earrings and see how they fit on the ear.

After making the Santas... they may be a bit big, as I wanted them to fit well on my daughter's ears. I'll let her try them on and see how she likes them.  If they're good to go I'll put the backs on the other 2 sets I have and she can give them away at Christmas time to her friends if she wants.  I really enjoyed making them... I wonder what I should try next???

** Update **

I had added the earring backs to the Santas last night and now the glue is dry... here's what they look like when I put them one.

Don't look too bad...eh!

20 November 2010

Something new to work on


I had been reading that some people who worked with Polymer Clay worked on a Tile.  I went out today in search of a nice smooth tile to work on and I couldn't find one so I decided to by a cutting board instead.  It's great to get away from working on some paper so I don't get clay on the table.  SO NICE TO HAVE!  I wish I had thought of it sooner.  Tonight I made some Christmas-y do-dads and I have to say it was so nice not to have to worry about the paper and colour transfer and getting holes in the paper.  It's a nice smooth surface... and I can't complain!

Cat Baby

I was on a bit of a roll after making my Shadow box and though I would give my try at a little character.  I had fun making my little cat baby.  Yesterday I had picked up some clays and some sparkles and throught I'd try them out on this little guy.  I had thought by adding it to a little brush that I could brush on the sprinkles nicely over the little fella.  Well, it didn't really work out as I had planned... the sparkles kind of stuck and clumped... not as awesome as I had thought but it's a learning process and here's the result.  I ended up scratching off some of the clumped up sparkles with my finger nails and I don't think it's so bad.

I am looking at getting something more together for Christmas and I'm hoping that I'll have a chance tomorrow to work on some ideas I have.  I guess I'm getting into the mood as it's started to snow last night.

Since heading into Michaels on Friday to take a look at what I could get my hands on for my clay projects I am looking forward to trying some new things... like sparkles, liquid clay, and I picked up some beads to add to my Christmas decorations... oh and some earring backs so I can add some polymer clay designs to them... it should be interesting... and hopefully I'll have a bit more to show you later on.

A Shadow Box with a little Name

With the new arrival of my nephew in a few weeks I figured I should make something for my brother and his wife for the upcoming arrival.  Now I'm really hoping that they stick with the name... since it fits pretty darn nicely in the shadow box I picked up.

I think I must have spent about 4 hours working on this little project and I have to say for the first time I went with a combination of Fimo clay and Premo clay... I'm not sure I'm loving the new Preemo clay I picked up.  Not as easy to get soft... and it really took a while to make it maliable... and my hands hurt!   But this was the only white soft clay available at Michaels when I stopped in there today.  I think it's really the season of Christmas knick-knack making because there sure wasn't much in the way of clays.  Which sucks because I was hoping to pick some more up... but really stuck with only a few, as I had to delve into the world of Premo and I didn't really know what that clay was like.

15 November 2010

Monday Madness: Christmas


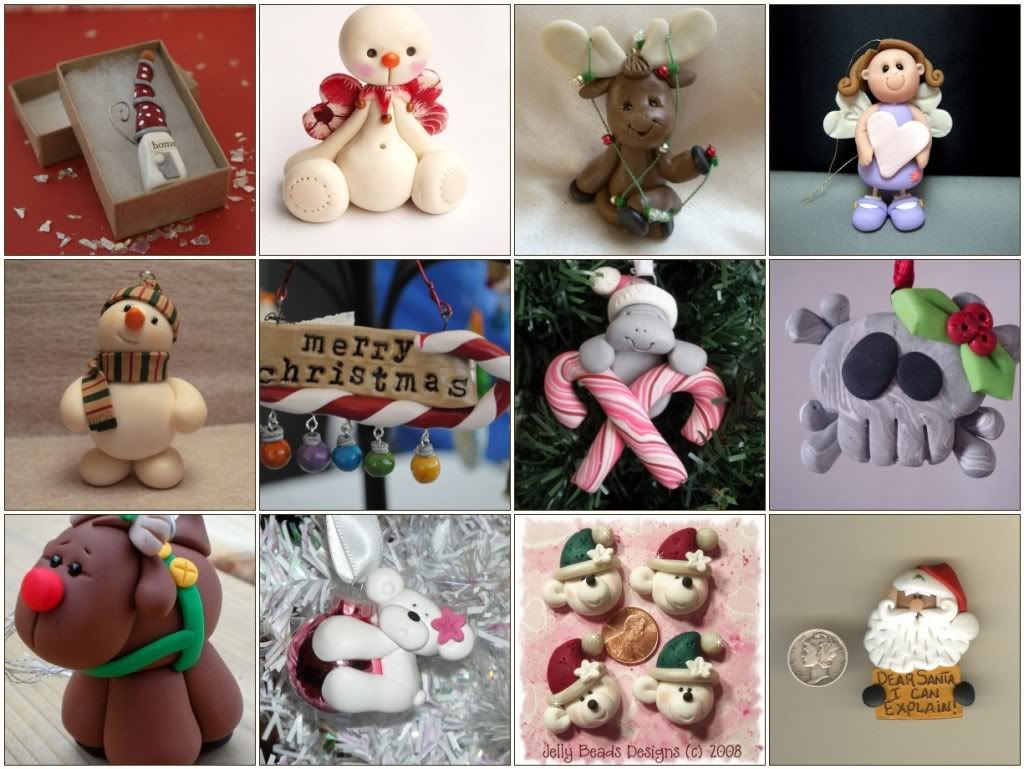
I'm on the lookout for great Christmas Ideas this year and thought I'd give Christmas ornaments a whirl since I'm really enjoying working with Polymer Clay.  There are so many wonderful designs and creative ideas... like how about a polymer clay character hanging onto a christmas bulb ornament or a little quirky scull and crossbones.... with holly to a Manetee with Candy Canes!  I just really enjoyed going through Etsy and checking out everyone's creativity and makes me want to get creating!

Here's a bit more about the pictures above... going left to right, row by row.
I'm not quite sure what I'm going to be making for Christmas this year, but I'm hoping to get enough time to do something homemade... for the first time since I was little.  I don't know what it is about thinking about creating something, setting your mind to it, molding the clay to how you want it to look, cooking it, and then the finishing touches of paint and gloss... it really gets me excited.  Maybe it's the creativity of it all.  Anyway... I hope you enjoy the picks I made today and it inspires you to create your own little characters and ornaments.

09 November 2010

Wedding Cake Toppers


I think I'm absolutely obsessing about Polymer Clay.  Since I've started just about a month ago I've been searching the Internet for ideas for my next creations I'm going to try my hand at.  I've been curious about those cake toppers that I've seen online.  I thought it was a great idea as we all know you get something like this done at a cake shop and then it gets put away in a container for a bit and then it has to be thrown out eventually. With Polymer Clay toppers you can always put it away, and then bring it out every year or whenever you have a special something happening... depending on the type of topper you have made. 

I found this video on YouTube and thought I'd share.  I thought the dresses were beautiful and I like the idea of the "not so realistic" look that they have.  I also found a great site called Feats of Clay by Sarah and I enjoyed reading a bit about her....
Not forgetting long suffering husband Allan, who seems to permanently walk around the house with bits of clay stuck to his socks!
For those of us who work with the clay... I know I get bits of it stuck on my socks and had a bit of a chuckle when I read it.  I think I may just have to give this a try and see where it takes me.  I like the idea of cake toppers and the idea that they can be kept forever really, first on your cake and then on a shelf... added to another cake... and it goes on and on. 

See, this is where I just start to get carried away and it's so much fun!

07 November 2010

Bought a Book Today


You see this is where it all started.  I saw someone who had made some little faces and pink ribbion magnets for the Breast Cancer awareness and I asked her how she had made them... hello Fimo clay.   So I decided ot look it up on the Internet as I'd never even heard of it before, and there they were.  Pages and pages and pages of little foods.

This is where I started my adventure.  Some of it was slightly embarrassing as I look at them now and they're a bit big.  What I got from it though was that I really enjoyed it... happy accidents and all.  So yesterday I stopped into Chapters and picked up this book.  I was stoked!

Here are few things I made last night... (I will be the first to admit... perfection isn't a word I would use for these little designs... handcrafted goodness... you bet!)

The first one I made from the Polymer Clay Cookbook.... APPLES!

Getting the shapes right and making sure they were
approximately the same size... which is suprisingly a bit
of a challenge for me.

Now they look about right!

After shaping them, I stuck in a pin and then placed some
brown Fimo clay on the pin and rolled it down to the
apple to make the stem.

Added some finishing touches... leaves!

Voila!  Apples :)
But it didn't end there... those pictures in the book were too tempting and I wanted to know how to accomplish the look and figure out how other people make bends that stick, things that won't fall off... basically I wanted to know if I was doing it right.

Next step... BANANAS!

Balls of Fimo clay are ready!

Add a bent pin... then mold the Fimo Clay around it.
Seems simple once you know the "secret"

Yummy Bananas!

I was happy to find that there was a method on how to create coffee cups... as I'd been making tea cups and they were the bane of my existance!  Now that I know how to make cups, it will be SO MUCH EASIER!

Mmmm... Hot Cup of Java!
It didn't stop there, I ended up making some Hamburgers and Tacos too...

I have to say this is one of the more fun little charms that I have
made... yummy tacos, with mutliple layers of meat, cheese, lettuce,
tomato, sour cream and green garnish.

These hamburgers are stacked pretty high, I wanted the
layers to be a bit thicker so that people could see them.  I'm
thinking if I make them again... thinner tomatos and cheese!
I am totally enjoying the Polymer Clay Cookbook and when I get a bit more time I'm going to show you more.  I'm thinking ice cream, waffles, bacon and eggs and maybe try my hand at a lemon cane.

LinkWithin

Related Posts Plugin for WordPress, Blogger...