Showing posts with label Fimo. Show all posts

05 February 2011

A Charming Day Five

A little bouquet of roses
This charm I ran with romance and what someone would get for their special someone on Valentine's Day.  In the process so far, I cannot find my little heart cutter... so I'm still a bit frantic about searching for it.  Not exactly a good time to lose it!

I'm also thinking I'm going to have to try putting my pictures in a better lighting setup.  Right now all my pictures have a bit of a yellow hue.  So I think if I ever do plan on selling these charms I'll have to take new pictures in better lighting so the true colours show up.  But I think that's still a ways a way yet.  I have to come up with some charms to fill the store... so far I have 5.  Not enough... yet.  I'm hoping by the end of the 28 days I'll have 28 charms and I'll open my Etsy shop on March 1st.

There's my second goal... March 1st.... open my Etsy shop :)

04 February 2011

A Charming Day Four

Little Sweet Chicky sent with Luv
I seriously liked making this little charm.  I borrowed my daughter's Sculpey Yellow as she had found it baked to a really nice yellow, which I hadn't found with the Fimo I had.  So I think my little Luv Chick turned out quite well... now to think of other little charms.

Any suggestions?

03 February 2011

A Charming Day Three

So I've been busy working on making the charms for my own little goal for February... and somehow in all this love fell a little Leprechaun.  Go figure.  I just felt like making him :)

I was wondering as I'm making these little charms, would you buy one?  If you wouldn't, I'd love to hear why - of course constructive criticism is welcome.. the mean troller type of comment... well, keep that to yourself please and move on to another blog that would like that sort of thing.  But seriously I'd love to hear your feedback!

Lookie Here... a Wee Leprechaun spreading his love. :)

02 February 2011

A Charming Day Two

I have to say when I'm making these little charms, I thought I'd have a ton of ideas.  Seriously.... so much out there that represents love that I was sure I'd have great ideas about making these little charms.  Not, so, much.  I've come up with 5 so far and I'm grasping for other ideas that were to roll with the them of love.  'Tis the month of love, right?

Well I decided to try my hand a Cupid... then after I'd baked it... realized I missed putting wings on the little fella.  So here's the one I've made (minus the wings).  This may give me yet another opportunity to make a nother little winged Cupid charm!

I also wasn't overly happy with the way the little fella's hair turned out, but maybe I'm being to critical.  I think I'll try to change it up a bit on the next little cupid I make.

Little Cupid... missing his wings... duh! :P

01 February 2011

A Charming February

I thought for February I would make some little charms that could go on a phone, necklace, bracelet or even maybe a snazzy pair of earrings. I thought I might try a month of charms that would relate to love ... As it's February ... But I ended up making a few love themes a little leprechaun showed up. How he got there I don't know :).

So here's to a charming month!

Little Love Kitty

31 January 2011

Bits and Bobs from around the Stratosphere

Mmmm... you look tasty... nom, nom, nom
I've been working on some little dragon-monster looking little cuties this past week.  They were such a hit at my daughter's school, that she ended up making some and handing them out to her friends.  She's gotten so into the clay, that she went an bought some of her own so she wouldn't be getting not what I have for clay.  Very cute... very fun for both of us.

I also so some pictures of little miniature Japanese figurines, so I decided to make my own with some left over clay I had.

I had seen these little Japanese looking girl figurines and decided
to make my own, entirely out of polymer clay... no paint
I enjoyed putting her together.  In a way I'm finding my fun in making these little characters and figurines more so than anything else lately.  I've been looking through Etsy and checking out my favourite blogs on clay and jewelery and loving everyone's creativity, but I'm still trying to find my own little niche.

Also I was thinking about how I might be able to take my love of clay and make it into my own little store/business.  I would be creating one of a kinds (OOAK... see I found out what that meant... finally!) and then selling them on a site like Etsy, maybe get a PayPal account and set up a little site of my own to showcase what I do and sell directly.  I've been reading Itty Biz and really enjoying Naomi's marketing tips and I have always enjoyed her writing style... it's no bullshit.  So refreshing!  LOL.

Totally fun to make, but her little beads on her sleeve fell off...darn it.

I'm thinking for February I might do something like 28 days of love.  Everyday I'll make a little bead/charm and show it here.  It's pretty ambitious for me, since I'm so hit or miss with what I can get done during the week, but it might be just the challenge I need to keep inspired and set in motion my little online shop.

If nothing else... it will be a bit of time to be creative and have fun :)

21 January 2011

Wall and Fridge Art

So even though I've been looking at working on some miniature foods with the awesome books that I received this week, I keep rolling back to doing little bits of wall/fridge art.  I'm not sure if it's just because I find it a bit easier to let my imagination go on these things and it's a lot less finicky... and I'm not so worried about perfection.  I just enjoy it.

So this is what I've been up to this past week.... and it's been fun!


A day at the beach

I have to say I enjoyed my Day at the Beach bit of wall art, because for the first time I made those little palm trees, and didn't reference anything for this picture.  I used old scrap clay for the base and the trunks of the trees and then rolled out combinations of colours to make the ocean, sky and the little crab.  It was fun to make and took a bit of time to put it together, but it was seriously fun  (yes, I know ... it was fun!! Heh.)

My bit of a skyline
 My skyline put together and I threw in a bit of wire to holdup the moon.  It was again placed on some scrap clay and then colours placed over top, outlined in black... throw in some wire and a moon and I think it turned out to be rather fun and colourful.

20 January 2011

The Books are here... The Books are here

This week has been pleasantly awesome... I got the books I ordered through Amazon and flipped through them to see what little wonders I can create and bake and show you.  Ummm... well.  I don't really think my first attempt at what appears to be rather simple turned out all that well. 


Huzzah... my Miniature Food book arrived and I'm so excited
to get started on learning the tips and tricks to making realistic food!

I really love how Angie Scarr documents her books.  Makes it very
easy to understand and gives really good pictures on how to make
each and every piece.  It even has layouts to make the small
stands and boxes. 

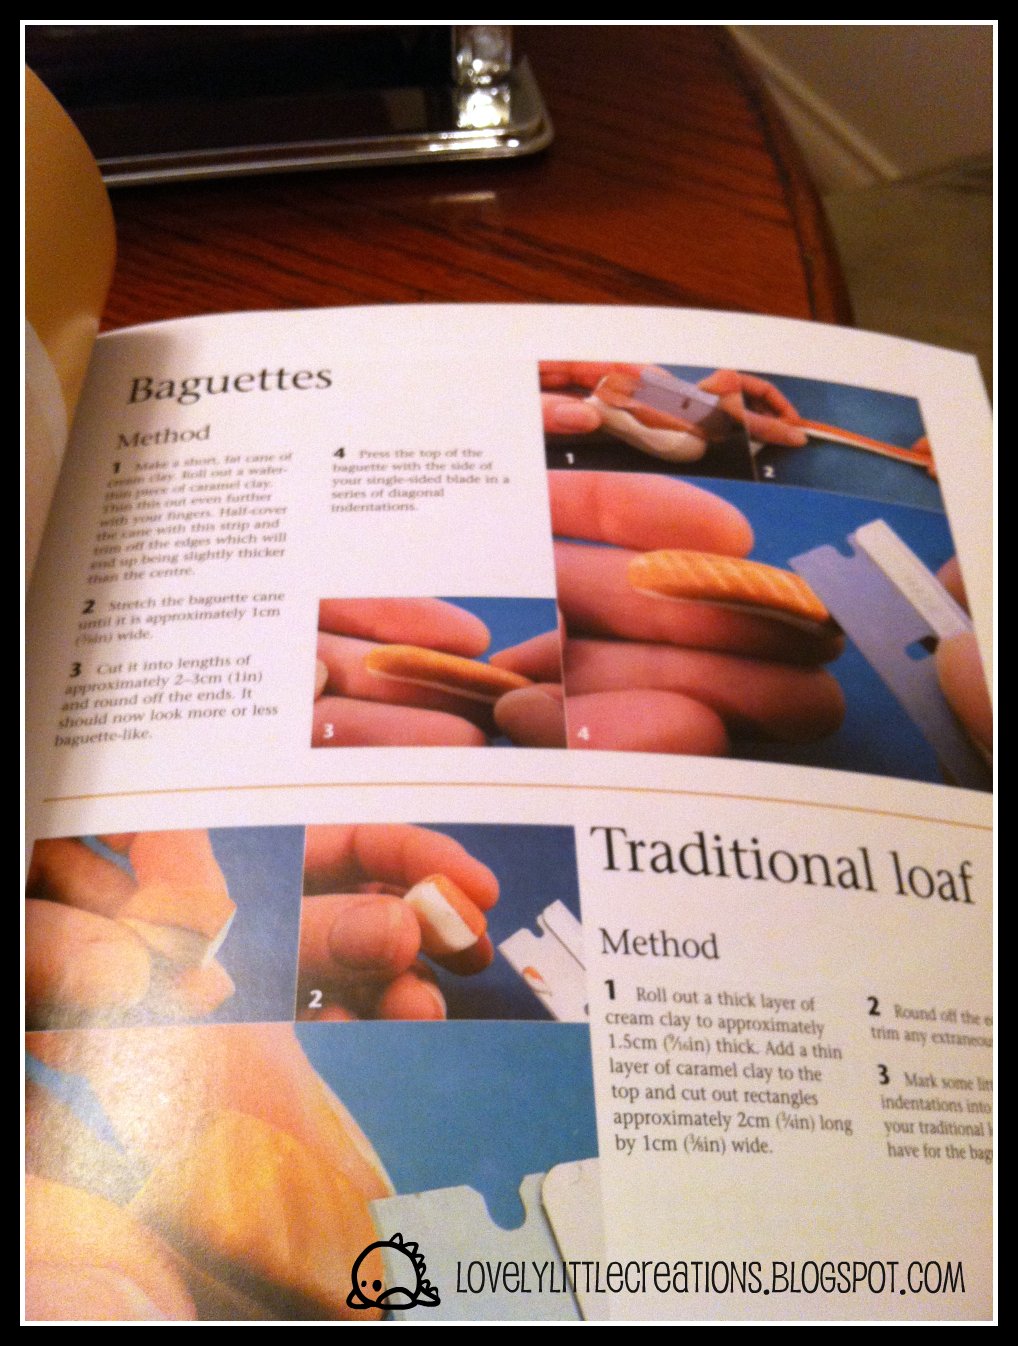
So I thought I'd try my hand a miniature bread.

Hello... bread.  Sigh... in the Angie Scarr book it was to be a caramel on the top, but when I put it together, it just ended up being rather dark looking in comparison to her's.
Miniature Bread... first attempt

I'm not really loving the french loaves, loaves of bread, bagles and buns
Of course I realize that this is my FIRST attempt at miniature food and following what Angie laid out in her book.  I have to say I really like how she's decribed everything step by step and has really good pictures for us to follow.  I'm thinking when she mentioned caramel... I think I might whiten it up... or even make it thinner.  Maybe my interpretation of wafer thin caramel... wasn't her take on wafer thin, as you can see - I think it's a bit too dark and my french bread got a bit out of control, portion-wise.

My version of "fruit cake"... ummm... minus the fruit :-)
Yes, this is another attempt out of Angie Scarr's book, she made a very beautiful fruit cake, which had poppy seeds in it and some real seeds on the top.  Since I had neither of those types of seeds in my kitchen, I went without the poppy seeds and made some polymer clay looking seeds for the top.  I'm not hating this one... in fact I kind of like how it turned out.  I have come to realize I need to get myself a course sandpaper to help me with my texturing, in this case I used one of my pins to make the little holes.


I'm actually pretty happy with the way this turned out
My attempt at miniature breads
So I've got this book and 3 other books to go through for my polymer clay adventure that this is going to be.  I'm excited.  Lots on miniatures, not so real miniatures for jewelery and a bead book.  I don't know how I'm going to put it all into my extra time (... and where I'm going to find the spare time?!?!) to get things going again as I'm very aware it's been very quite here on the blog!

05 January 2011

Into the New Year

Over the brief holiday I had this year (oh do I wish it was longer!)  I was messing around with my clay and trying my hand at some of the things I'd seen online ... no, I wasn't feeling overly orignal by any stretch of the imagination... and I tried making one of those beads I'd found in my Flickr roamings.... only smaller and well a bit more mashed up than the original I'd come across.

Here is a ball of some old scrap clay that I figured would work well
as my shape when I placed the coils of clay around it to make the bead

Using the Extruder I got for Christmas I made a nice coil of purple
and wrapped it around the scrap clay I had.  I then flipped it over
as I'd put a hole in the top and made it a bit bigger to fit
the clay I planned on putting in it.
  
I had thought of trying my hand at making them beads, but I just haven't quite got the knack of making them without squishing the bottom of one end as I wrap around the coil.  So I decided to make it a little plant pot instead.  Why?  Because I'd been on the hunt for some miniature flower pots, and I did find some online but at this time I can't be ordering new things online (money, money) and so I decided to use the resources I had and improvise.


My improvised tree that I made out of my bead

I'm not sure how easy it is to see what I did here, as I've got a bit of "stuff" in the background of this shot, but I liked how it turned out, so much in fact I tried my hand at another bead and made a twisted up little plant with flowers sticking out of it.


A little potted plant with some funky pink flowers

Pretty little tree and potted plant

It was fun to do and I really felt free when I was making the little plant.  I don't know if free is quite the right word to use, but I felt relaxed and felt like I was really in my element and enjoying the moment.

So much so... you can see in the background some little birds I'd made.  Inspired by some creations by JooJoo (who does great work!)

Little birdies

I just felt liberated and enjoyed the moment of just being able to create and not getting frustrated because something didn't look right.   Actually it went rather smoothly all in all... lol.  I think I'll make some more little plants because I had so much fun making the two I've shown you.  I don't know, one minute I want to make miniature foods and the next I want to make cute little plants and animals, jewelery and mastering how to make a Skinner blend.  SIGH!!!!  It's coming together, and the thing that is most definite is that I'll have a hard time getting bored with clay... too much to get into!

26 December 2010

A delightful cup of Tea

 As you may not know I love a nice cup of tea and this Christmas my Mum and Dad bought me a fabulous RED teapot.  They know my favourite colour and I am just now enjoying my first cup of tea goodness!


I have been making a few changes to how I'm listing those great sites that I come across and add to my site for anyone to take a peek at.  I'm starting to think I'm a little link crazy though... and may need to figure out how to put those sites on my site without taking up the whole sidebar.  I hope that everyone had a Merry Christmas this year and got everything they desired and more :)

 Besides the fabulous teapot I recevied I also got a clay extruder.  I'm going to give it a whirl and see how it goes.  I went to their website, because they said that they had some clay ideas and projects... and I was sadly a bit disappointed with the projects.  I'm hoping that somewhere in the future that WalnutHollow.com will come up with some more ideas, because I would have thought that with a Clay Extruder you could do so many new things.  Since I'm an absolute newbie to it... I'm not even sure what I can do with it.  It looks like there could be endless possibilities but I'm currently at a bit of a loss. 

I'm not sure if anyone else has used the Walnut Hollow Extruder and have any tips or tricks on using it, or even some projects I could try using the extruder would be awesome.  I'm finding myself full of ideas bouncing from making little characters and then I'm off to the races trying out making some beads, then I'm trying some jewelery designs, going through my beading magazines and then back to making polymer miniature foods for jewelery.  I feel like I'm all over the map, and I find that there are some people with blogs dedicated to just one thing...I HAVE NO IDEA HOW THEY DO THAT!  As I'd be wanting to try everything I can think of or even see online.

I really don't know how they stay on one topic... as I would find it so hard to do!


So I'm off to enjoy another cup of tea and try making some cute little
characters I think, something not too hard to do and it can a bit of fun like little birds, cats and maybe a dog... see where it goes.

I also see on Flickr and even on Etsy that many of us put our little creations up against rocks, sticks, and little backgrounds.  I'm thinking I'm going to have to look into that a bit more and even try to focus on the lighting for the shots, because some of them are coming out a bit dark or not quite as appealing as I think they should be.

I'm curious how long many of you spend some time setting up your shots of your creations?  Do you just wing it and add them or do you take some time setting up the scene?  Do you spend much time processing it - like adding your copyright or link or anything like that?

21 December 2010

Flickr'd ... again

I have to say that so far I'm really enjoying viewing some great work from the Polymer Clay group on Flickr.  I came across this super cute birdhouse design:


Birdhouses____________

I think I'm still going "wow" to how creative people are with their clay.  I love, love, love this design.  Cute little birdhouse broaches.  It's just so fun to take a look through the different clay groups on Flickr and see just how many people are out there creating every day and enjoying what they're doing.

Tropical Wave Necklace

How beautiful is that necklace.  Created for donation to cancer research.  Beautiful!

Blueberry Cheese Cake

Looking at this super cute miniature cheese cake makes me so hungry!  The start of my current obsession with polymer clay was to make these cute little miniatures so they can be added as jewelery, cell phone decorations, or just to enjoy.  So cute!

Flower rings

Flower rings


Seriously, how cute are these flower rings???  I would love to learn how to make flowers like this one.

Mix and Match Magnets

Mix and Match Magnets

Haha!  I wouldn't have ever thought of creating different outfits for little people that you can stick to your fridge and have some fun dressing them up and changing their looks... I could see this being fun for kids and adults.  LOL.  FUN!

05 December 2010

Flowering Field of Flowers

So this morning I tested out my new pasta maker to see if I could make a great looking tile background.  I wasn't sure if I were to run the colours through the pasta maker if it would stretch to the point where I couldn't use it and it would end up being wasted clay... and well I figured I'd try rolling the different colours of clay individually and then cut them together and joint them by blending the clay joints together with my fingers.  I think it started to come together quite well.   From there I debated on what I would put on the background as it looked as great place for a sheep or two.  But I ended up going with flowers.

I thought I would try building a very simple cane of polymer clay to make some funky flowers, because I had thought of having gold trim around the white of the flower and how would I accomplish that best... I thought a cane would do it.

Here's how the process went:

Putting together the layers of polymer clay.  Wasn't
quite sure how to put in the curves of the hills, but
found if I overlapped the fimo clay and then cut
it, it put together a nice flow and then smoothed the
layers together with my fingers.

The background is complete!  It is about 10x10cm

My attempt at my first polymer clay can ever.  It started
to come together quite well.  I went with a black
middle, white around it, then some red and white then
surrounded by more white and then gold.

The finished polymer clay cane.  Looks like a big
shiny cigar.  I stuck it in the freezer for about 10 minutes
so it was easier to cut and would stop the clays from
bleeding together when I cut it.
The finished product... pretty flowers
I have to say I really enjoyed putting the flowers and blades of grass on the background... really enjoyed putting the grass on there.  I found out that my glittery white, wasn't so glittery and more transparent which made the flowers look a bit funky.  So I know if I'm going to do it again, no glittery white effects Fimo, and just plain white Fimo is in order.  But for a first attempt at flowers, I'm pretty pleased and I've got a few more ideas I'd like to try and see how it goes.

04 December 2010

My little link frenzy

You may notice that the sidebar on this blog has pretty much exploded with links to other sites of crafty crafty people.  It was like I couldn't stop.  I know that it may not be search engine friendly to have so many links on the sidebar (I know, why should I care... it's a part of my past that I just can't seem to shake... silly SEO.)  But you know what, I don't really care.  I mean I may know I shouldn't but I just don't care.  I love, love, love finding new sites and there are so many out there that are full of awesomness and written so well that I couldn't stop myself.

I have found so many wonderful creative people that I feel so utterly inspired.  I've got my handy dandy journal and I'm going to start doing some sketches.  I'd like to take a whirl at some wall art again.  I really enjoyed making the last one and I'm hoping today to pick  up a pasta machine so I can roll out my clay... what a time saver I'm hoping it will be... as well the clay will be consistantly one thickness... oh and I can then blend multiple colours and make some nice mixes.... yes... I'm excited!

You can see as I hop from one idea to another I haven't forgotten my plans... yes Christmas, yes jewelery, yes some freakin' awesome wall art that I'd love to create.  I'm just feeling like I could go a million miles an hour and I don't feel like I'm organized enough to do it!

My Journal to get some
ideas on paper before
I forget ... which  happens
 more than I would
 like to admit!
If plans fall in to place today I'm going on a road trip for the afternoon and I'll take my journal with me to sketch out a few ideas that I have for some wall art that I'd like to start.  Maybe some ideas for bracelets that I saw online too... see what I have for time on the trip and keep the creativity going :)

I'm hoping to get my hands on a bit more clay... I seem to keep running out not realizing that these little projects I've been doing, do take up a lot of clay.  I am going to try looking online for some wholesalers maybe or where I can buy my clay cheaper than Michaels... since they run $2.99 each for the Fimo clay that I like working with.

So my plan this weekend is to work on one wall art project, maybe if it's good enough I'll give it away as a present for Christmas this year.  If it's more a work in progress... then I've got tons of wall space here at home that I can add it to :)

Learn to Knit on Circle Looms
This past week I came across circle looms, where you don't use the needles but loop the wool around a circle.  Since I haven't got a clue on how to knit I thought I might look into this a bit further too. Looks like something that I could figure out and enjoy making a few things, like touques, mitts and fun fingerless gloves for work.

You see I start looking around online and I get even more ideas... since I know quite a few people who love to knit and I've only ever tried when I was younger... but I didn't really have the knack for it then, the Circle Loom seems a bit more user friendly and a way that I could try to get into that sort of thing.

See.... so many ideas.  Now just to find the time where I can fit it all in.  Hmm... maybe with the Christmas holidays that I've got coming up I might be able to accomplish some of the things I'd like to do.

Does that mean I have to prioritize!?!  Eeeep.

01 December 2010

You would buy my stuff... REALLY?

One of my co-workers the other day saw me flipping through my bead magazine and mentioned that if I ever thought of making something from the magazine she'd buy it.  Even before I'd made anything... she would by one. 

I was sort of surprised... she's really nice mind you, but I was wondering if maybe sometime I might.... should...maybe....sell some of my bits and bobs that I've created.  I mean I'm still SO into the learning phase, but maybe someone would like to buy a pair of Santa earrings or maybe something I create from my bead magazine.  I don't know, but it was a really nice feeling to think that someone would like to buy something from me.... and I'd not created anything yet!

Yup... they are pretty cute!
With Christmas looming on the horizon I'm wondering if I'll have enough time to get everything done that I'd love to do.  Make some more Fimo clay Christmas Trees, Earrings, Jewelery.... it goes on and on for me.  I'm going to make a little list of what I'd like to do and get crack-a-lackin' :)

21 November 2010

Christmas Tree, Oh Christmas Tree

Yup, I'm crazy.  After making the Santas I kicked it up a knotch and decided to try making some Christmas Trees.  They are made out of Fimo Polymer Clay and I added some little sparkly beads to give it a little sizzle.   They aren't too big, they can be placed on a mantel or a Christmas tree... the choice would be yours to make.  But I thought they were fun... my only worry when I was making them was if I would have enough clay.  Luckily I had both a plain red and an "effect" red that had the sparkles in it.  So I tried one tree of each. 

Here's how they turned out...

I rolled them out... it took about 3 rows of the Fimo Clay to get
my trees to the right size.  I honestly thought it would take
more clay to get the desired look... happy it didn't!

My two trees are ready to be decorated!

My completed little trees.  One with just swirled white Fimo
clay and the other with dots of Fimo and my little jewels
for that added "OH LA LA"
I have to say that I am really happy with the way the little trees turned out.  Now just to add a ribbon on the top so that they can be added a  Christmas ornament... or not, depending on what you want to do with the little ornaments. 

Having just taken the Christmas tree ornaments out of the oven.. I don't recommend baking them with the jewels.  Even though it's a low temperature, it still make the jewels cloudy and they fell off.  So I put some new ones back on with a bit of glue and they look pretty fab-oosh!

Santas, Santas and more Santas

 Well with my new cutting board to use to make my little creations on, I decided to start with some Santas since it's getting closer to Christmas.  I had debated on how many to make and what they might be used for.  Do I create a little Santa character, do I make some charms, do I make some jewelery?  I wasn't too sure, but yesterday I had picked up some earring backs and figured they'd be cute and maybe someone might want to wear them. 

I decided to give it a whirl...

Starting out with my clays for my Santas
I decided I should make them pretty small... but with the detail I planned on giving the Santas I couldn't get too small.  It was a bit of a toss up now as to what I wanted to do, but I decided to stick with earrings.
Santas faces are coming together... slowly!

Now a little personality... faces are done

Here's the completed pair.... HO HO HO

Excuse the dirty finger nails...so full of clay!  But these are
the backs I picked up at Michaels on Friday and I figure
I'll make a pair of earrings and see how they fit on the ear.

After making the Santas... they may be a bit big, as I wanted them to fit well on my daughter's ears. I'll let her try them on and see how she likes them.  If they're good to go I'll put the backs on the other 2 sets I have and she can give them away at Christmas time to her friends if she wants.  I really enjoyed making them... I wonder what I should try next???

** Update **

I had added the earring backs to the Santas last night and now the glue is dry... here's what they look like when I put them one.

Don't look too bad...eh!

20 November 2010

Cat Baby

I was on a bit of a roll after making my Shadow box and though I would give my try at a little character.  I had fun making my little cat baby.  Yesterday I had picked up some clays and some sparkles and throught I'd try them out on this little guy.  I had thought by adding it to a little brush that I could brush on the sprinkles nicely over the little fella.  Well, it didn't really work out as I had planned... the sparkles kind of stuck and clumped... not as awesome as I had thought but it's a learning process and here's the result.  I ended up scratching off some of the clumped up sparkles with my finger nails and I don't think it's so bad.

I am looking at getting something more together for Christmas and I'm hoping that I'll have a chance tomorrow to work on some ideas I have.  I guess I'm getting into the mood as it's started to snow last night.

Since heading into Michaels on Friday to take a look at what I could get my hands on for my clay projects I am looking forward to trying some new things... like sparkles, liquid clay, and I picked up some beads to add to my Christmas decorations... oh and some earring backs so I can add some polymer clay designs to them... it should be interesting... and hopefully I'll have a bit more to show you later on.

A Shadow Box with a little Name

With the new arrival of my nephew in a few weeks I figured I should make something for my brother and his wife for the upcoming arrival.  Now I'm really hoping that they stick with the name... since it fits pretty darn nicely in the shadow box I picked up.

I think I must have spent about 4 hours working on this little project and I have to say for the first time I went with a combination of Fimo clay and Premo clay... I'm not sure I'm loving the new Preemo clay I picked up.  Not as easy to get soft... and it really took a while to make it maliable... and my hands hurt!   But this was the only white soft clay available at Michaels when I stopped in there today.  I think it's really the season of Christmas knick-knack making because there sure wasn't much in the way of clays.  Which sucks because I was hoping to pick some more up... but really stuck with only a few, as I had to delve into the world of Premo and I didn't really know what that clay was like.

LinkWithin

Related Posts Plugin for WordPress, Blogger...